The Events grid is where you will find a list of all transactions associated with your event pages. This grid is accessed from the top of the list in the Events module.
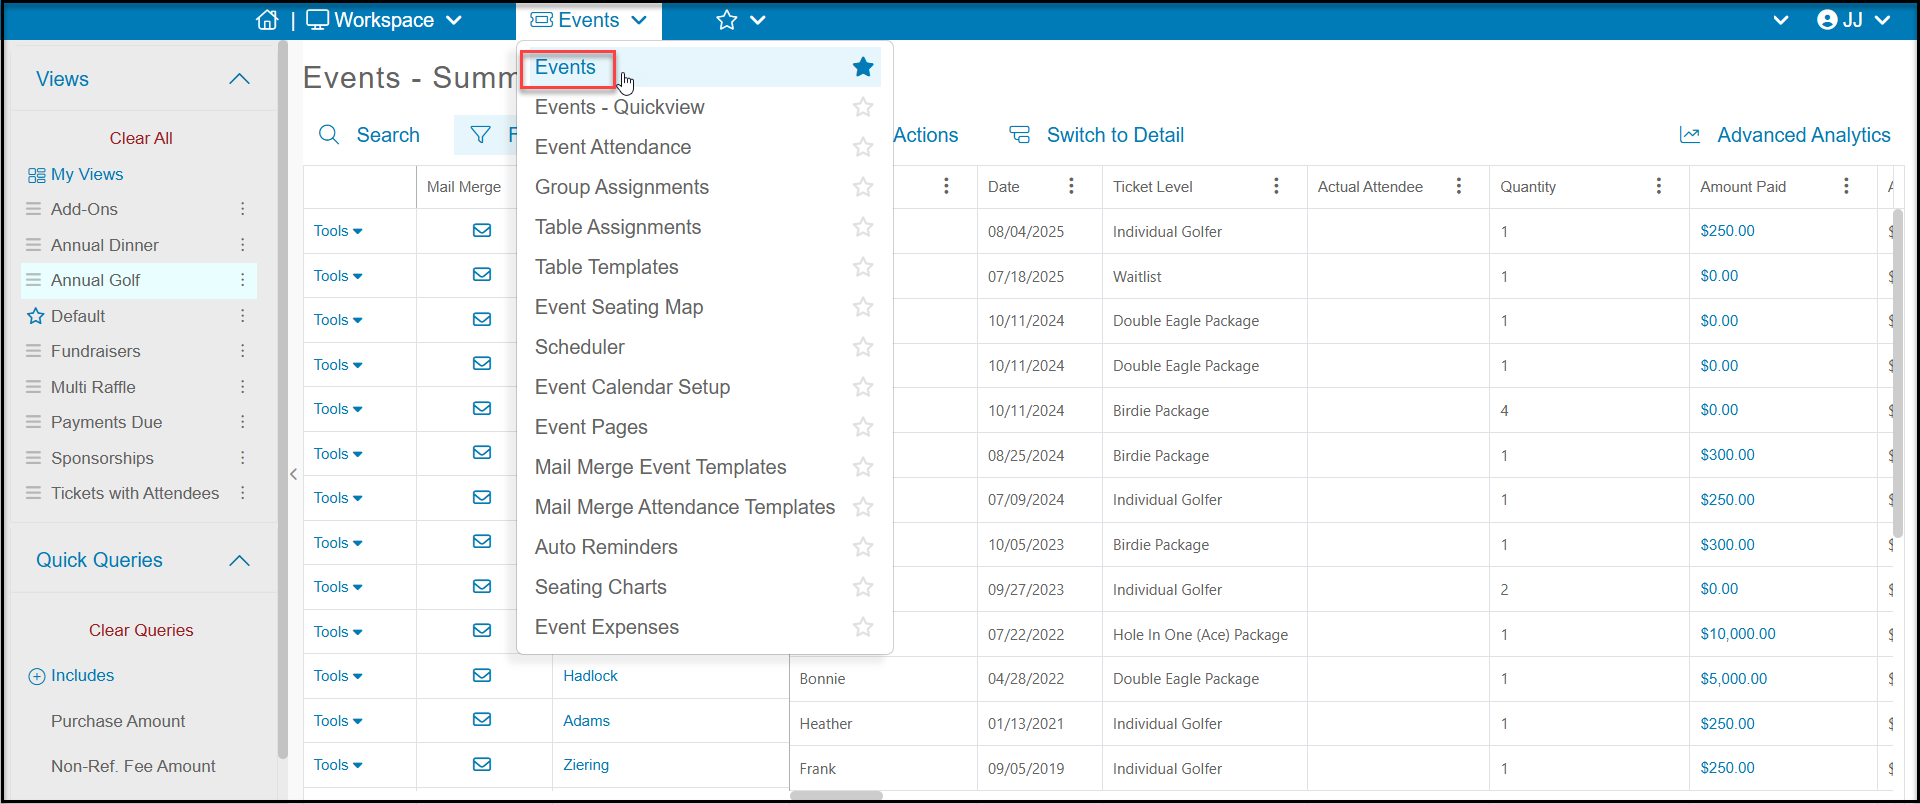
Events - Summary
The Events grid has two options, a Summary and a Detail grid. By default the Events-Summary will be shown first.
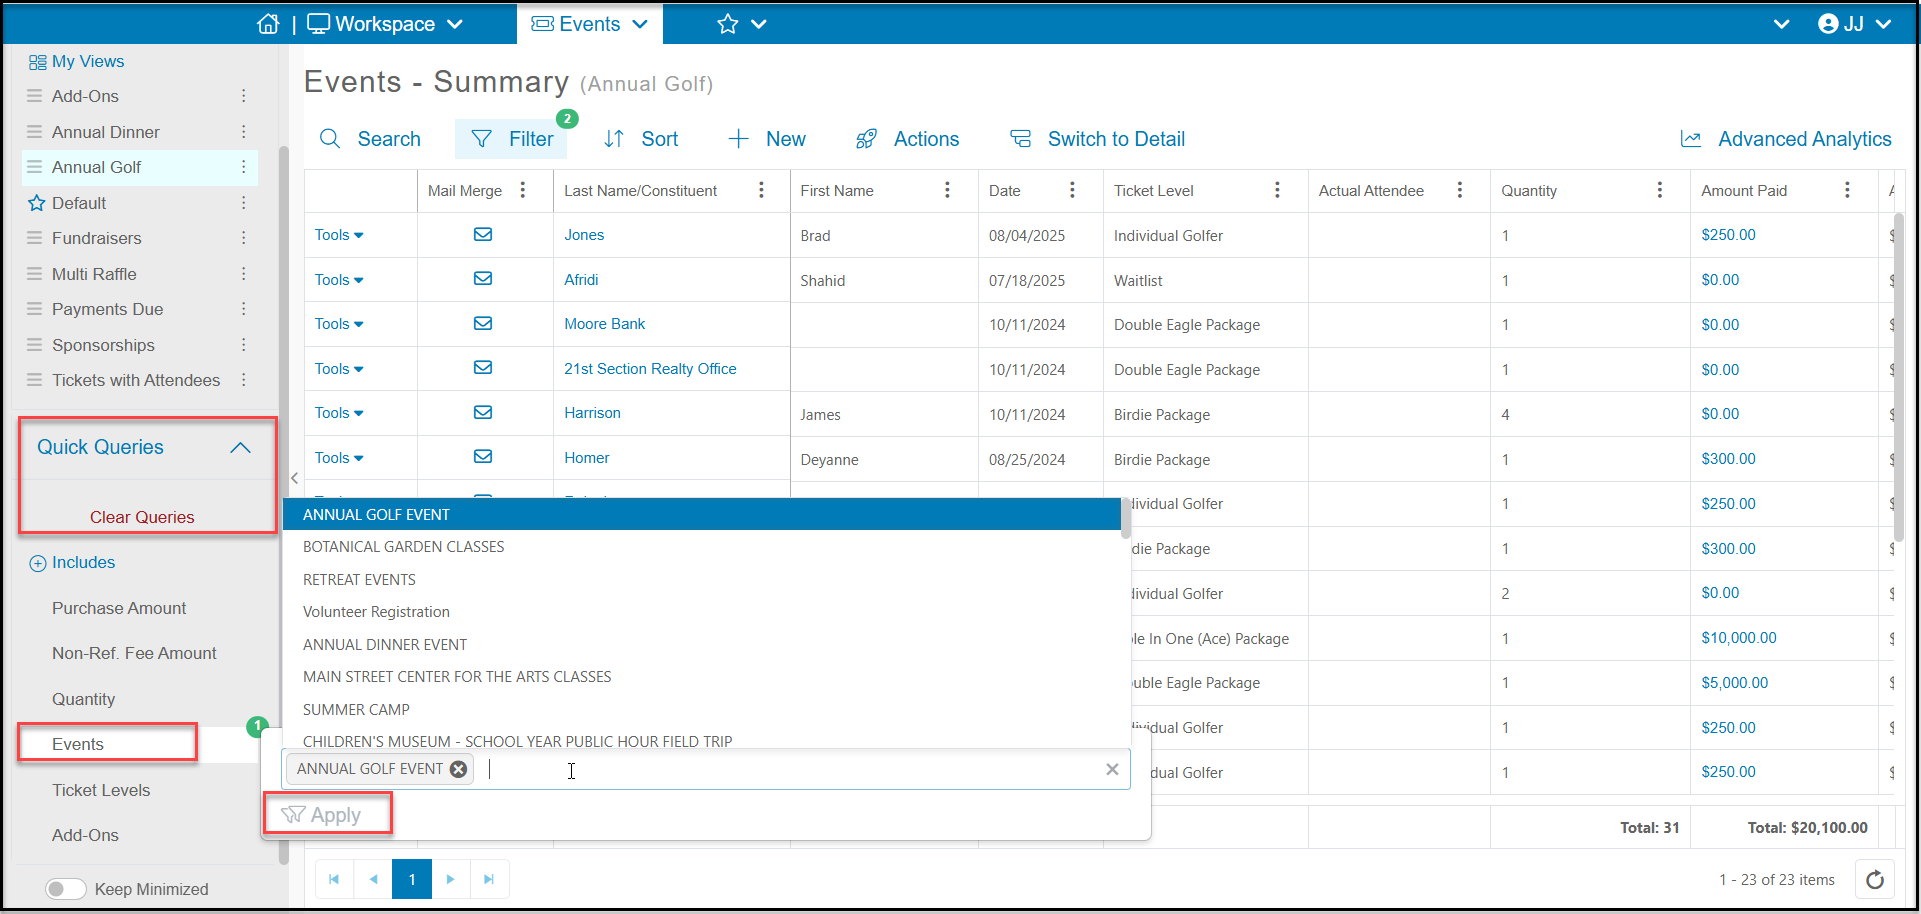
You will need to select the event you wish to view by using the Quick Queries menu in the grey side bar. If the side bar isn't visible, click the small arrow in the center of the left side of the page to view it.
From the Includes menu, click on Events. Use the drop down list to view a list of events, note that they are in order of the event most recently modified or created. Once you have selected your event, click Apply to load the grid with the data.
If you wish to view multiple events at once, you can select multiple events from the list if desired.
Helpful Columns on the Events - Summary Grid
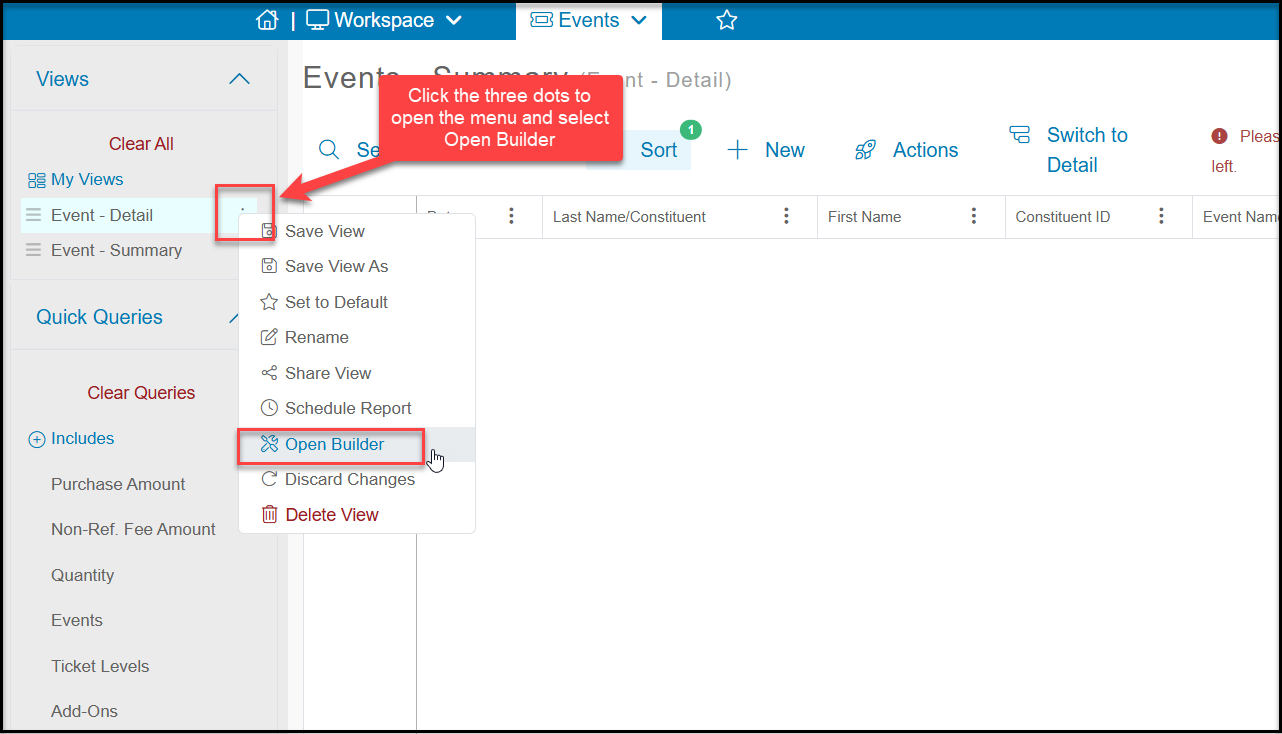
Think of the Events grid as the event transactions grid, since its primary purpose is to show you details about the purchase and other financial information. You can customize the view by dragging and dropping columns into different locations on the grid. You can also use the View Builder to select which columns to view and which to hide. The View Builder is accessible by clicking on the three dots next to any view under My Views and selecting Open Builder. You can learn more about the View Builder in this article "Creating a View with the View Builder."
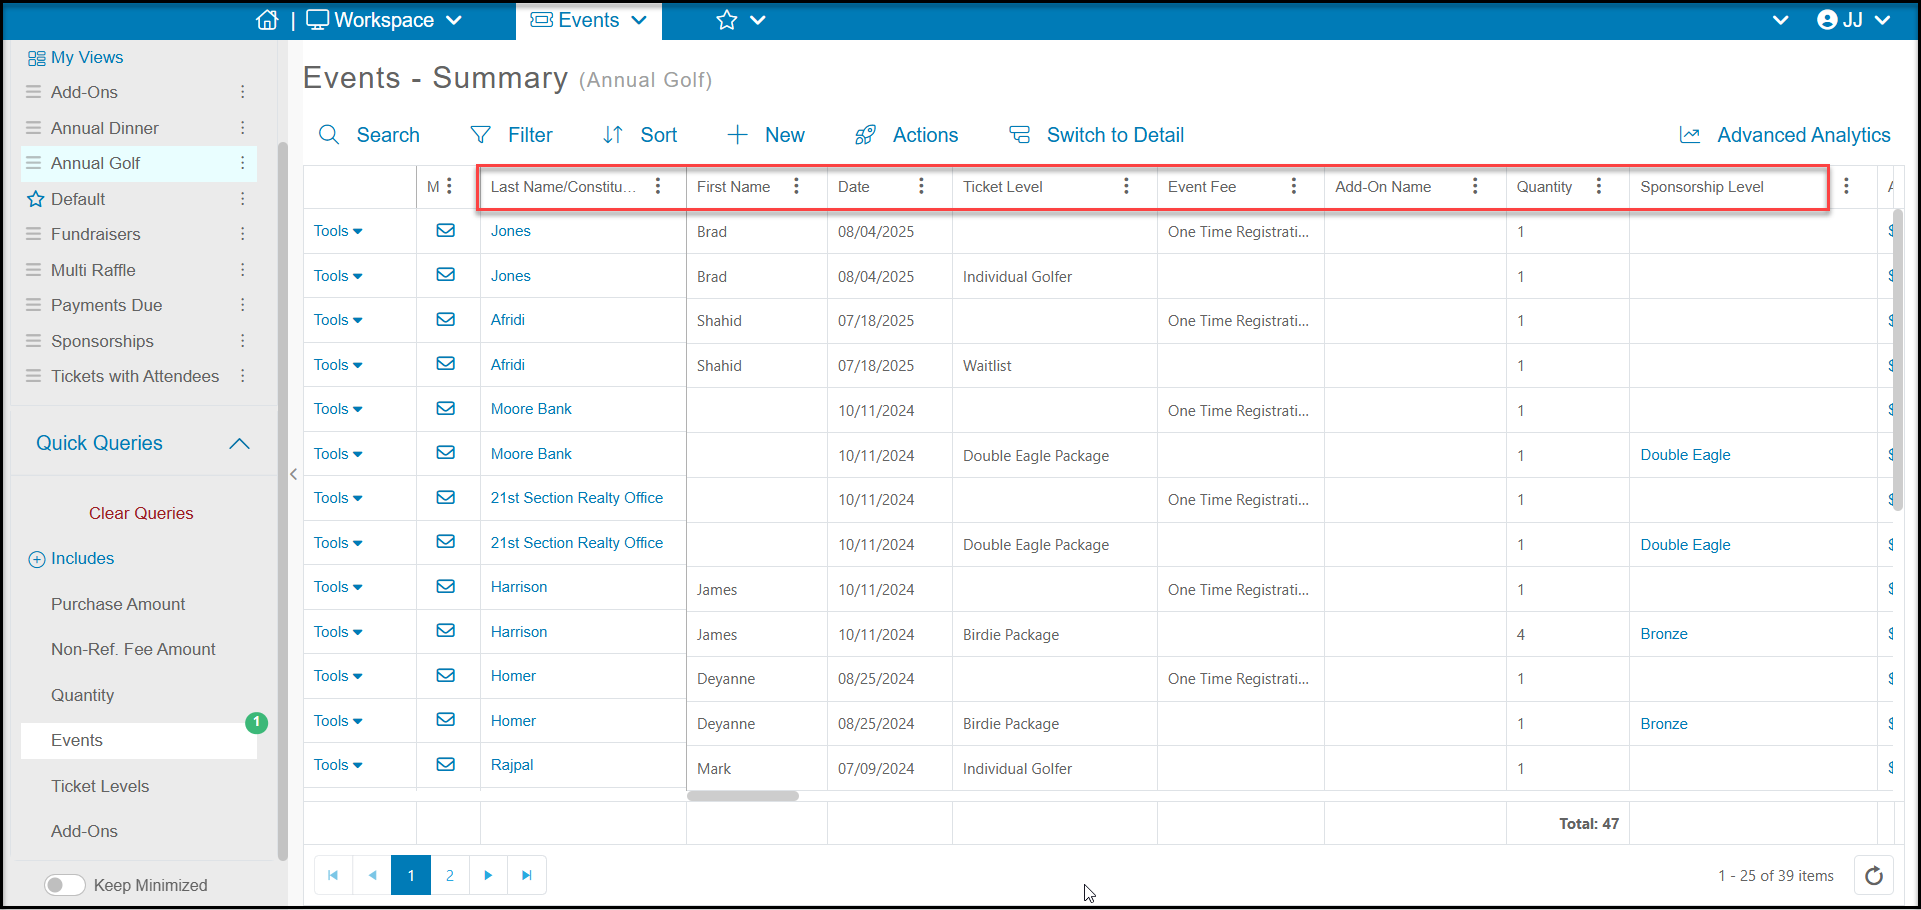
On this grid you can see fields like:
- Last Name/Constituent - the name of the individual or company constituent who registered.
- Date - the date the transaction was recorded.
- Ticket Level - the ticket level(s) purchased by this constituent. There will be a separate row for each ticket level the constituent registered for.
- Event Fee - if your event included an event fee, you will see a separate row for the fee.
- Add-On Name - if the constituent purchased any of your add-ons, you will see a separate row for each add-on selected.
- Quantity - how many of each ticket level or add-on was purchased.
- Sponsorship Level - if your ticket level was linked to a sponsorship, you will see the name of the sponsorship. Sponsorships are a special feature that can be set up in the Fundraising module. To learn more about Sponsorships, be sure to review that lesson in the Fundraising Module course.
- # of Attendees Per Purchase - will show how many people are admitted with each ticket level, for example, a Table Sponsor may receive admission for 8 with this purchase.
- This number must be 1 or greater for the attendee to show on the Event Attendance grid.
- If the # of attendees per purchase is set to “0” this ticket level will not appear on the Event Attendance grid.
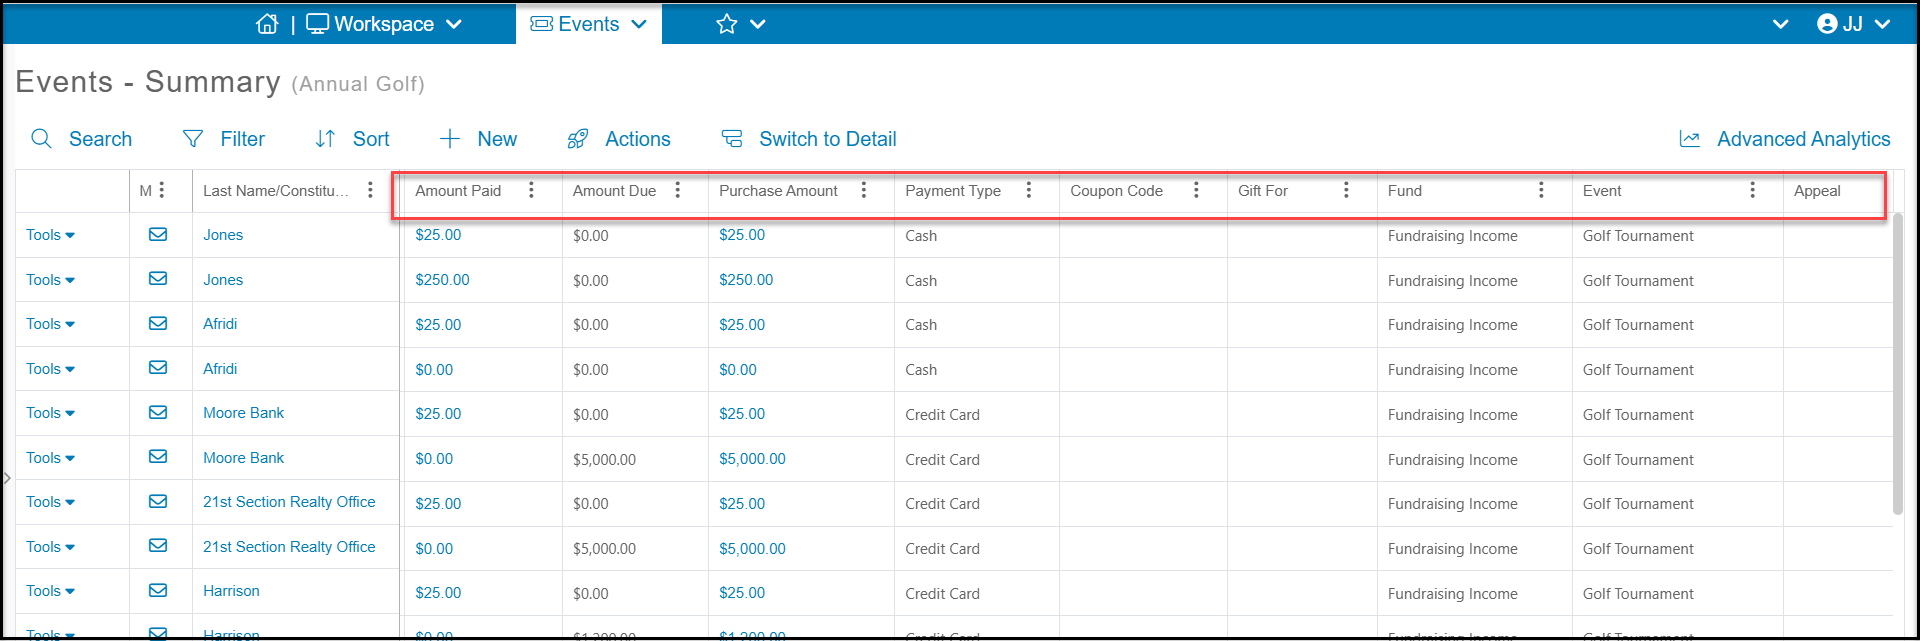
- Amount Paid - How much has been paid so far for the purchase
- Amount Due - Any balance due for purchases that were marked as “pay later”
- Purchase Amount - The total purchase amount, which is the total of the Amount Paid and Amount Due
- Payment Type - How the transaction was paid for
- Coupon Code - If a coupon was applied, you will see the coupon code used for the ticket level
- For-Fund-Event-Appeal - Revenue categories for the different levels, fees, and add-ons if they were different than what was set up as the default for the page.
Search and Add New Transactions
The Events - Summary grid has a Search feature at the top left side of the grid to search for a specific constituent, ticket level, or add-on.
Clicking on +New, then Event Purchase will open a new window to select the event page you would like to open to manually enter an event registration.

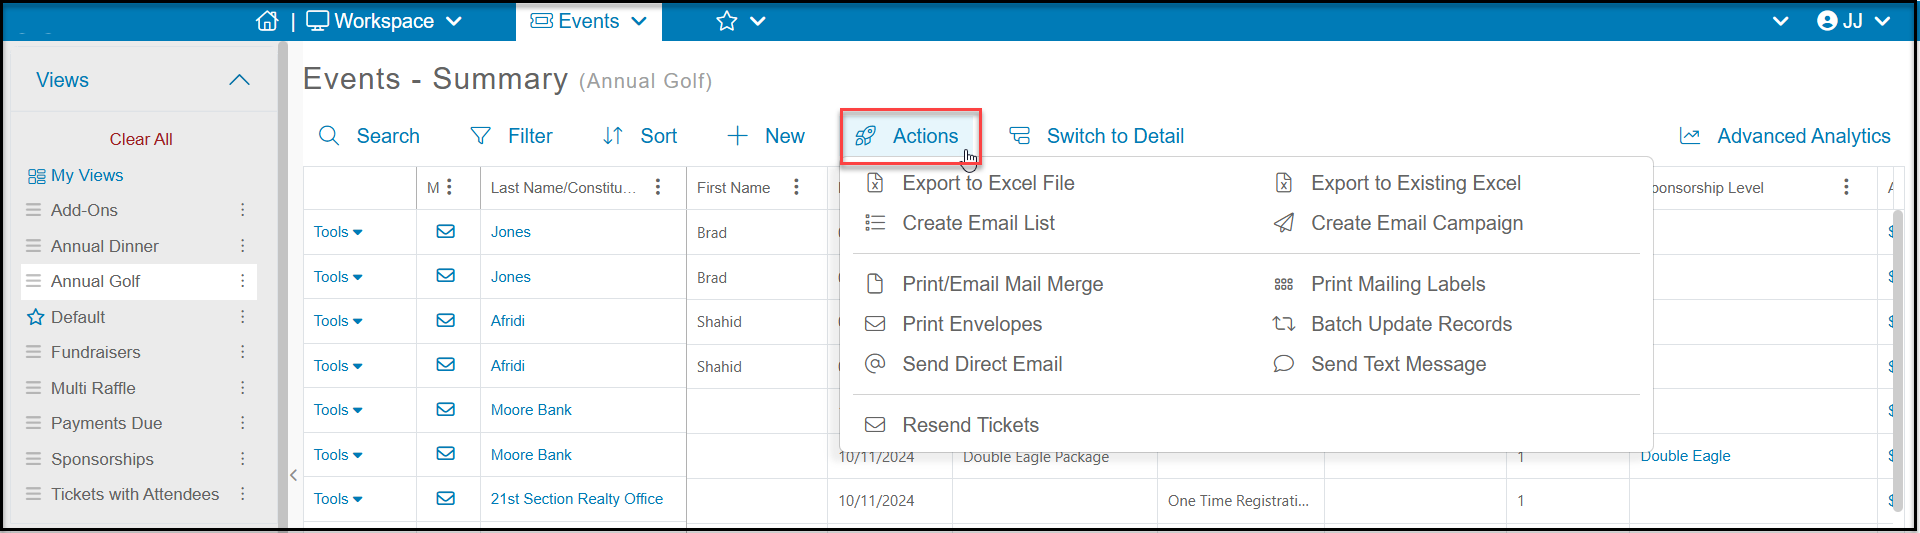
Actions Menu
The Actions menu includes all the typical features for communicating with your list of registrants, but it also has a feature to Resend Tickets. If your event is a ticketed event, you can resend up to 100 constituents their tickets at a time. If your list is longer than 100, you will need to add filters to reduce the number to 100 and resend the tickets in batches.
Resent/Print Tickets
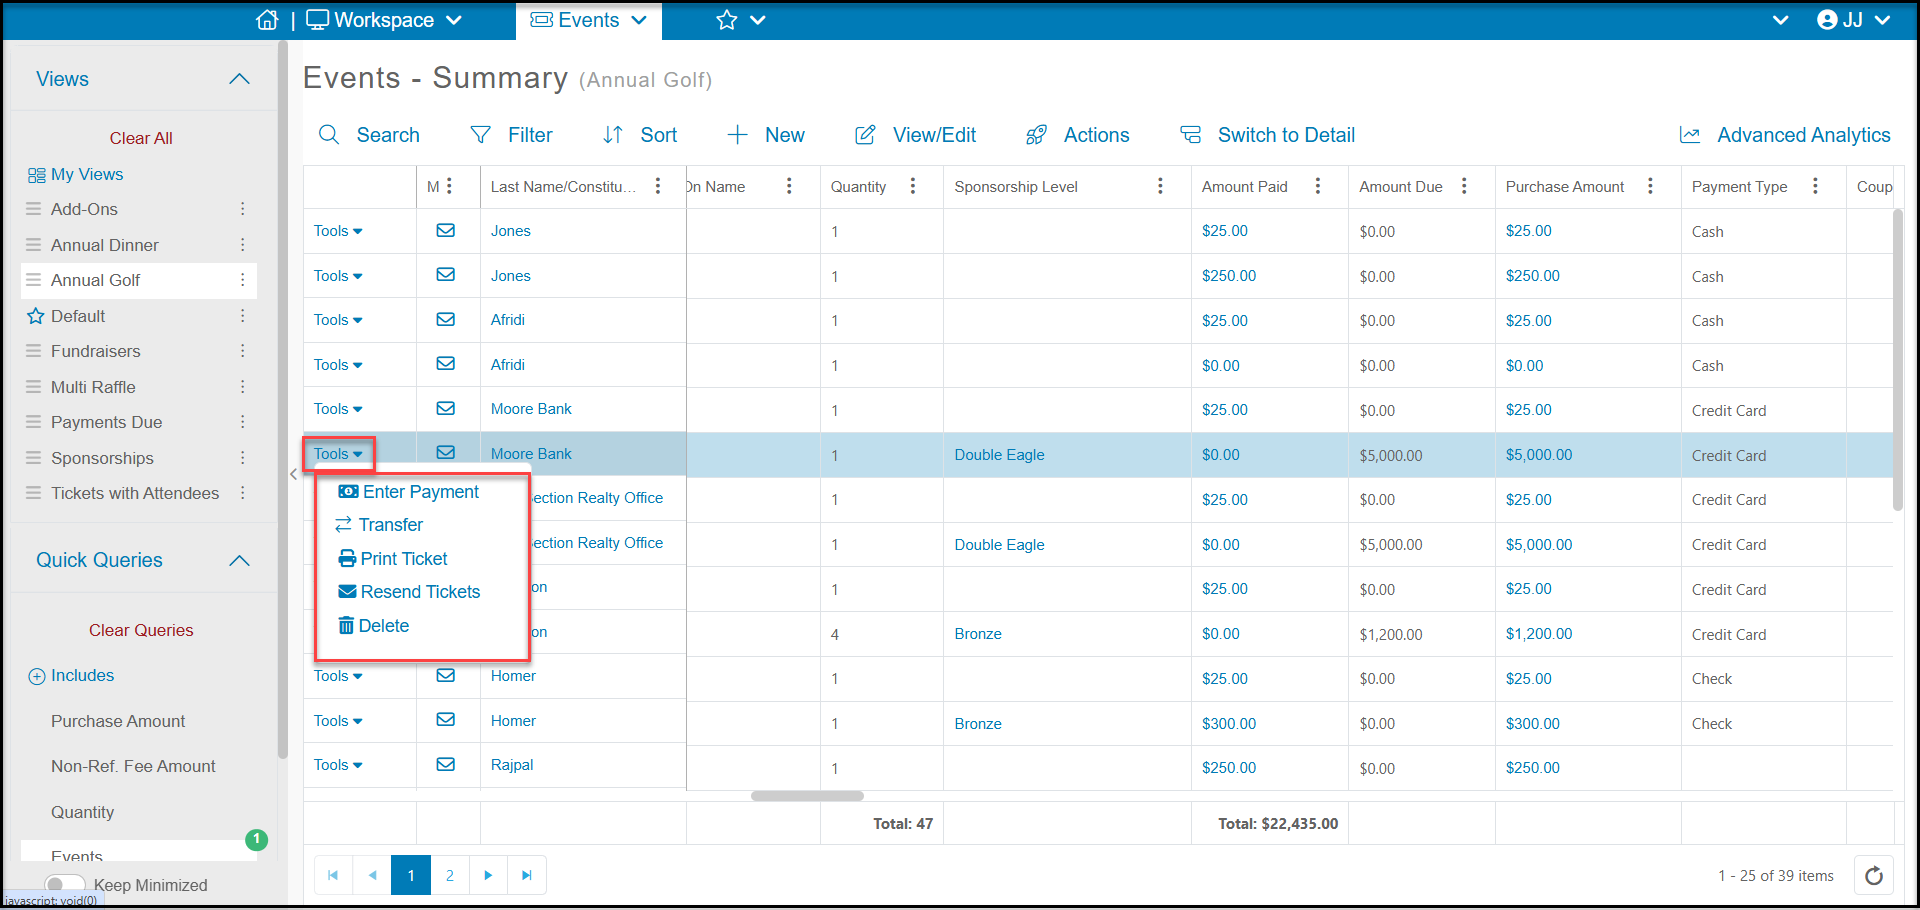
On the left side of each row you will find a Tools menu. If your event is a ticketed event, you can Print Ticket or Resend Tickets for just that specific transaction to the registrant.
Transfer Ticket Levels
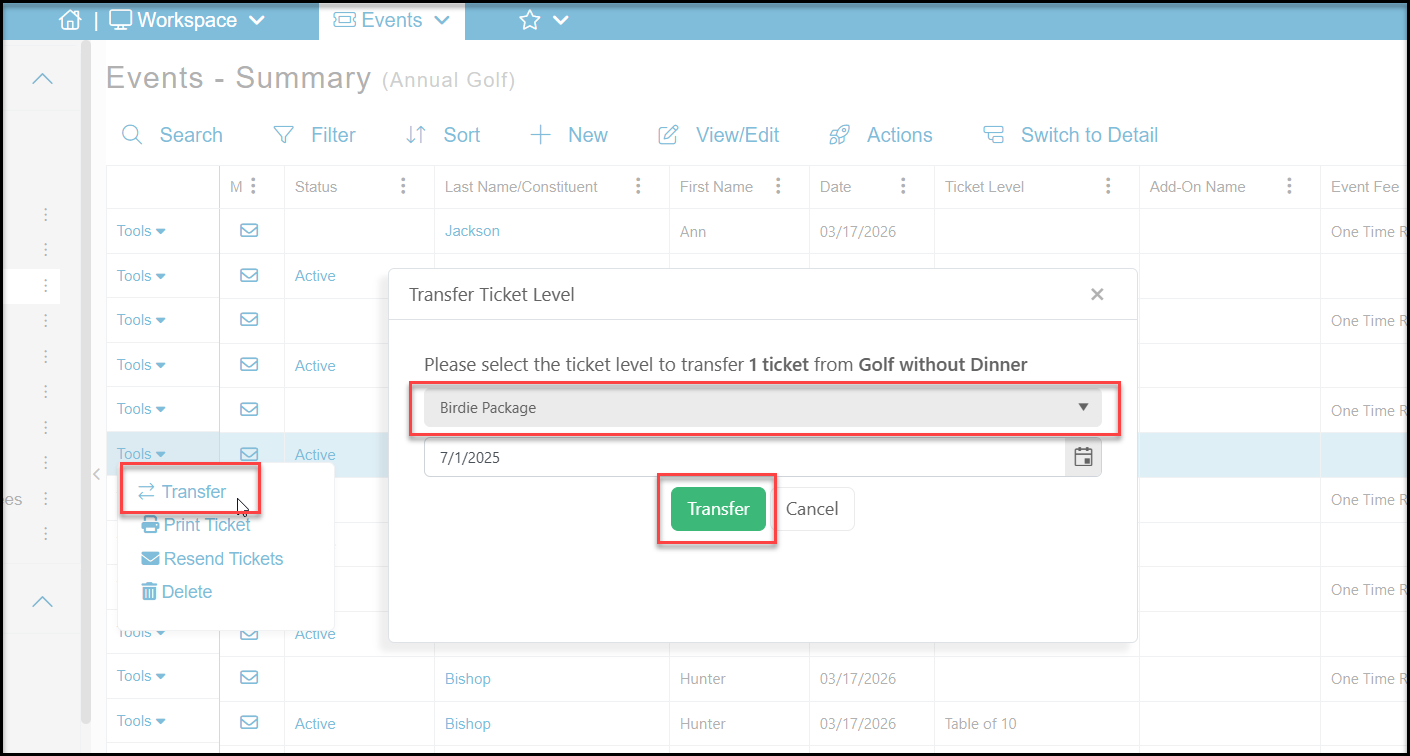
The Tools menu has a Transfer feature allows you to transfer the ticket level from one level to another.
- It does not allow transferring the ticket to another constituent.
- Clicking on Transfer will open a new window to select which ticket level to transfer to.
- The transfer does not affect the financial transaction, so there is no money exchanged.
- If the ticket were a downgrade, you can issue a refund on a credit card purchase using the Transactions grid.
- If the ticket was an upgrade, the constituent would need to provide a separate payment as a general donation for the balance.
- For non-recurring events, you can select the ticket level to transfer to from the drop down list and click Transfer to complete the action.
- Once the transfer is complete the previous ticket level will become available again and the newly assigned ticket level will be decreased.
- Transfer cannot be undone.
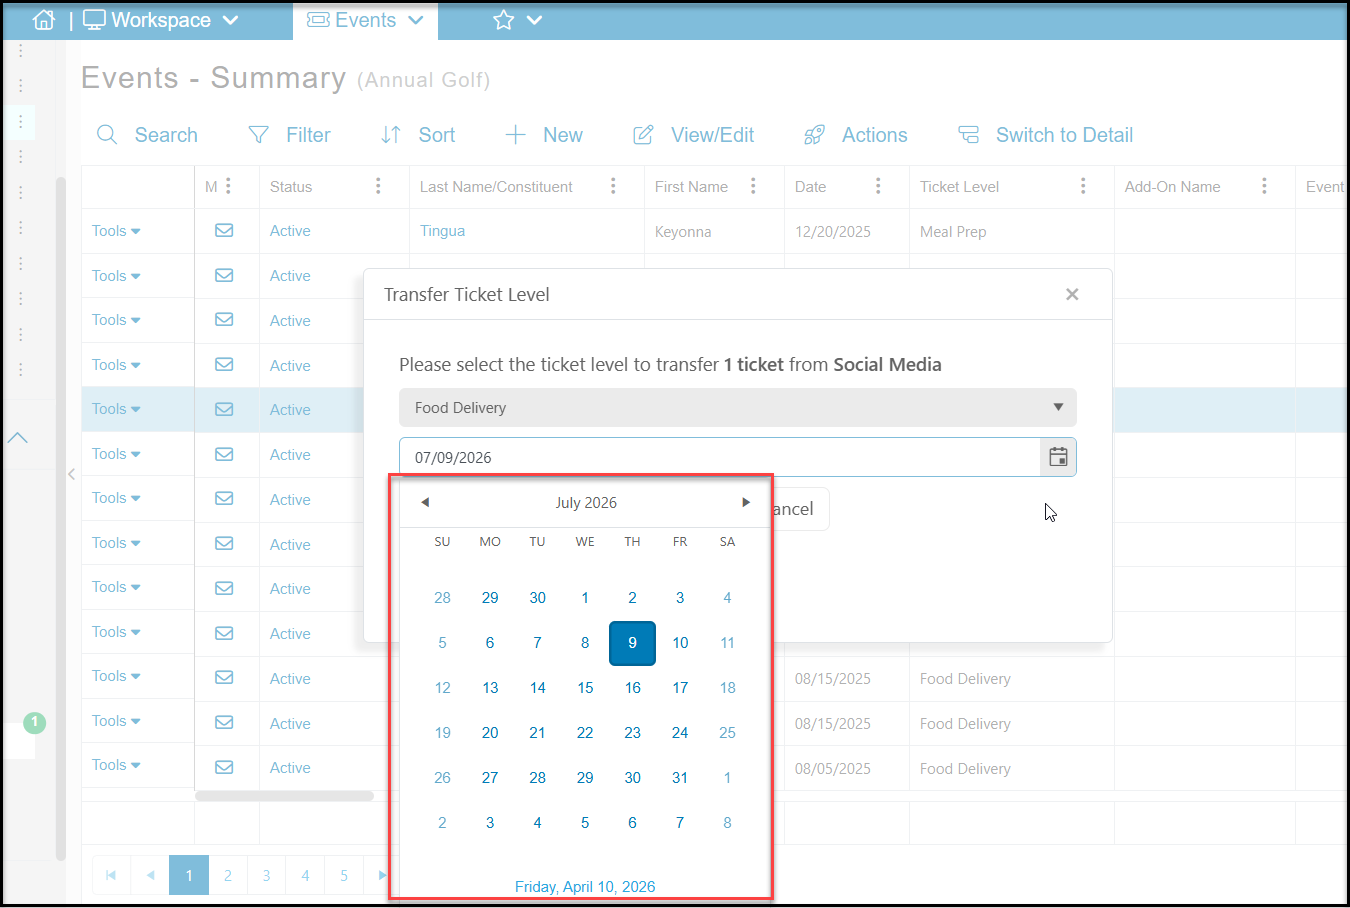
- For Recurring Events, there is also an option to transfer the day as well. So you may choose to keep the same ticket level, but transfer it to a different day on the calendar, or change both the level and the day.
- Clicking on the calendar icon will open the recurring event calendar to select the day to transfer. Once the new date is selected, click on Transfer to complete the transfer.
- Transferring days also does not affect any financial transactions and cannot be undone.
Recording Payments for Pay Later Event Transactions
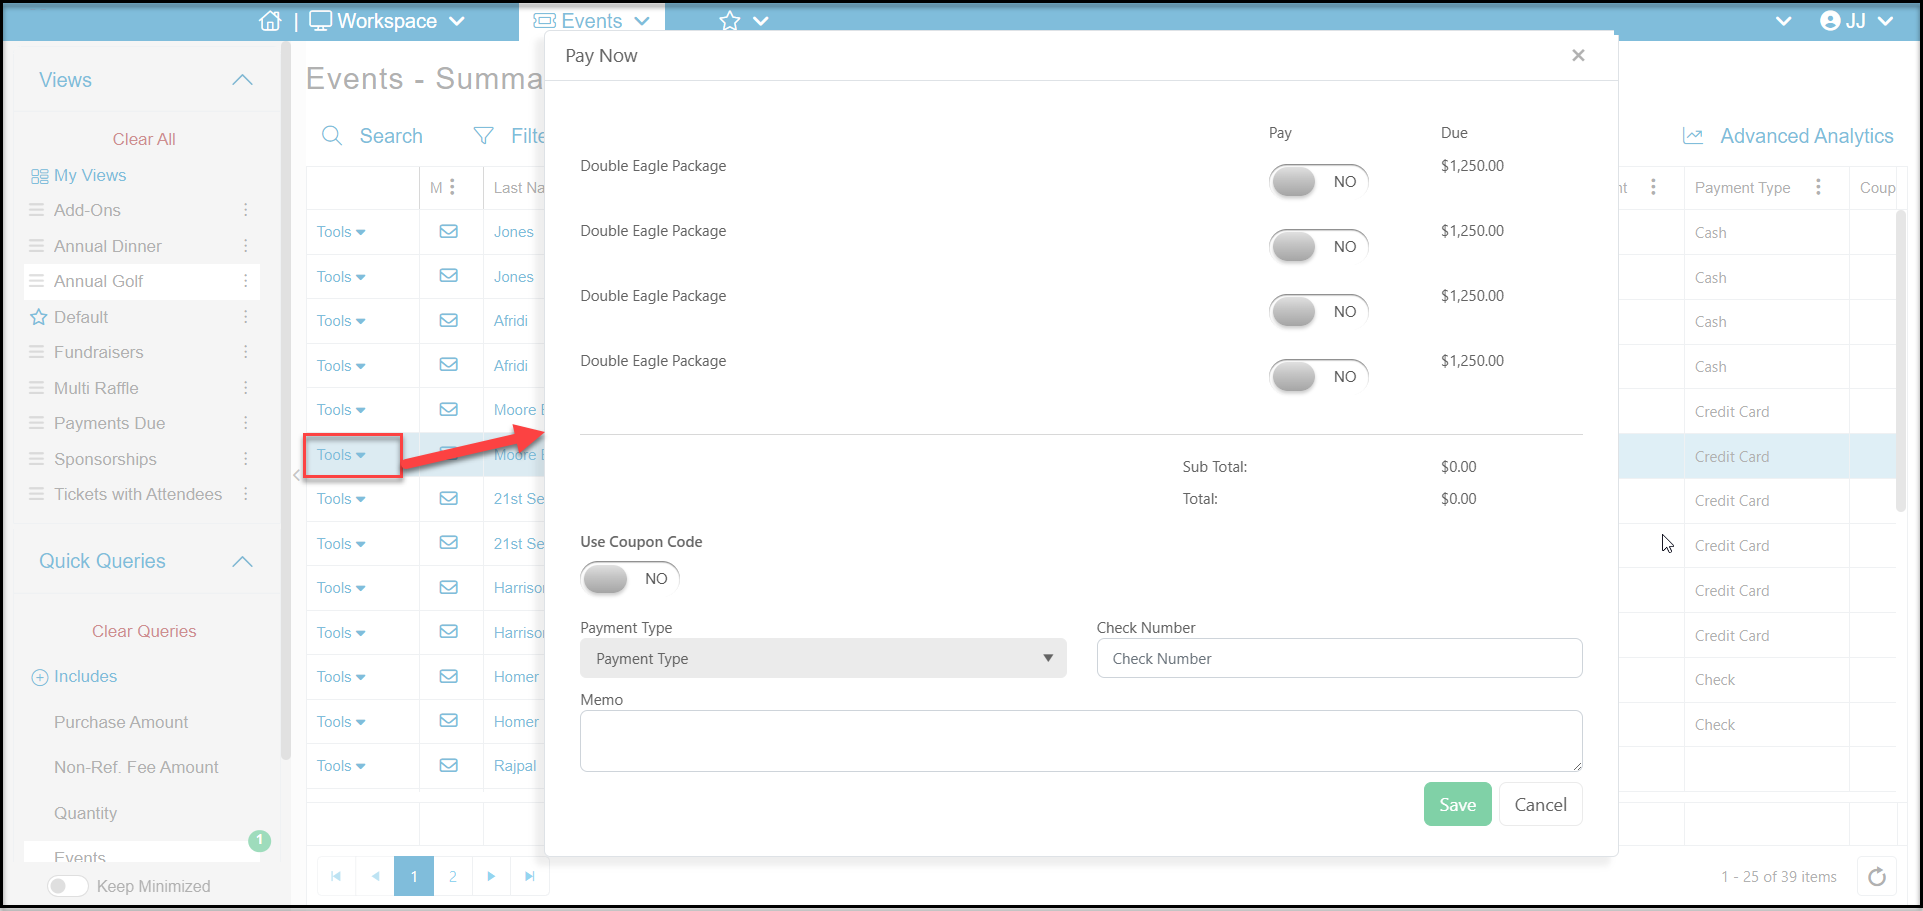
If the constituent has an Amount Due for their transaction, you can select Enter Payment from the Tools menu to record the payment.
- The payment breakdown will show an amount due for each ticket that is included in the purchase.
- The example below shows a balance due for a $5,000 Double Eagle Package, which includes 4 attendee tickets.
- This allows you to record independent payments for each ticket if necessary, for example if each player is paying for their own ticket in the foursome.
- Click YES under Pay to indicate which ticket payments are included in the transaction.
- You can apply a coupon using Use Coupon Code, setting it to YES and entering the code.
- In the drop down menu under Payment Type, you can select how the payment is being made, including processing a credit card through this window.
- Click Save to record/process the transaction.
Deleting Transactions or Updating Attendance Status
Using the Tools menu, you can select Delete to completely remove a transaction. From the Event-Summary grid, this will delete the ticket levels, add-ons, and fees for the entire purchase.
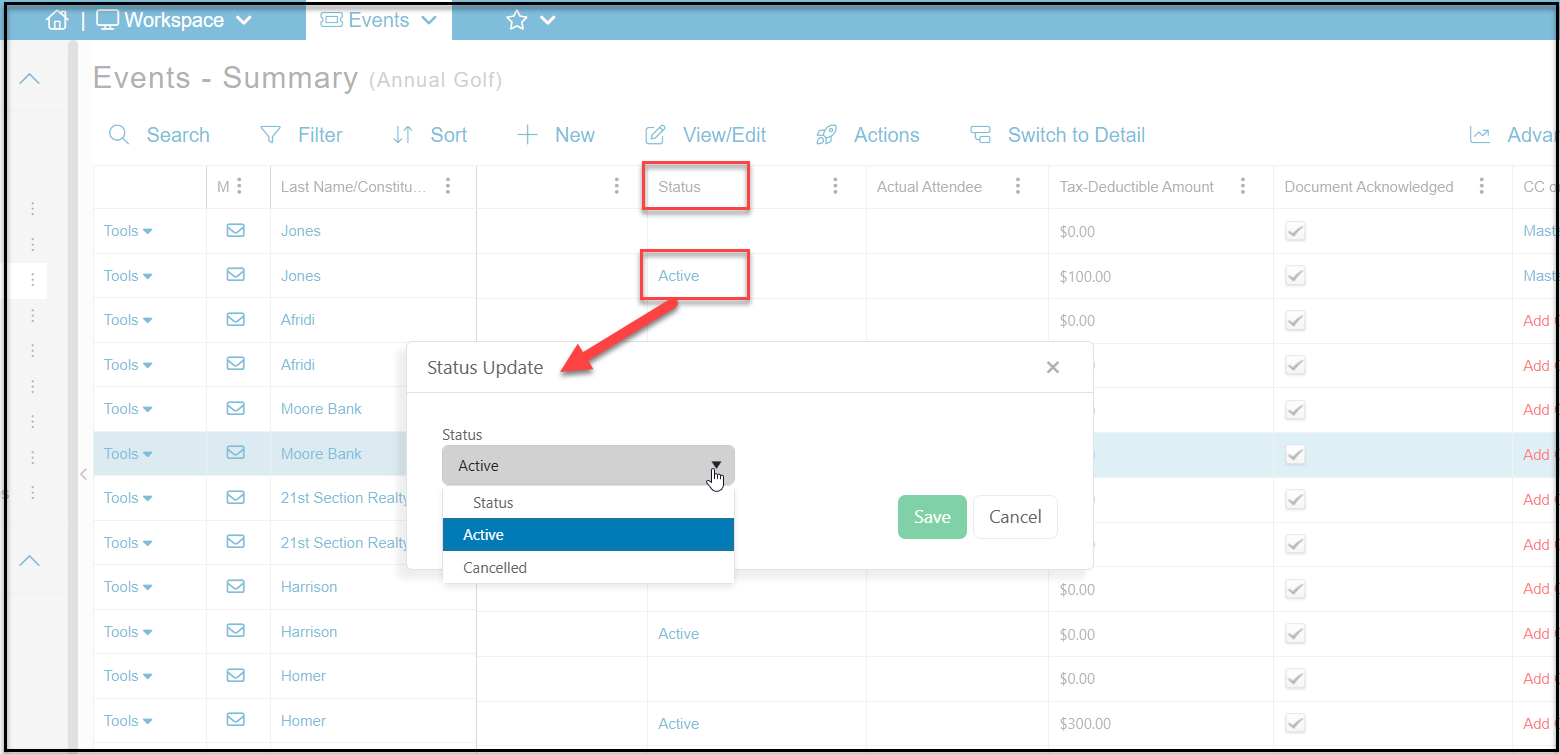
Alternatively, if you would like to keep the transaction for the financial record, but show that the constituent will not be attending the event, using the Status column, you can click on the Active status to open a new window.
Select Cancelled to:
- Remove the registrant from the Attendance List
- Recycle the Level or Add-On so it can be resold
- Send a email notification to the event registrant and any email addresses listed in the event setup.
- You will get a popup message confirming the cancellation.
- Submitting a cancellation does not automatically process a refund. The internal DonorView user must go to the Gifts grid and manually issue the refund from the registrant’s event transaction.
Adding Credit Cards
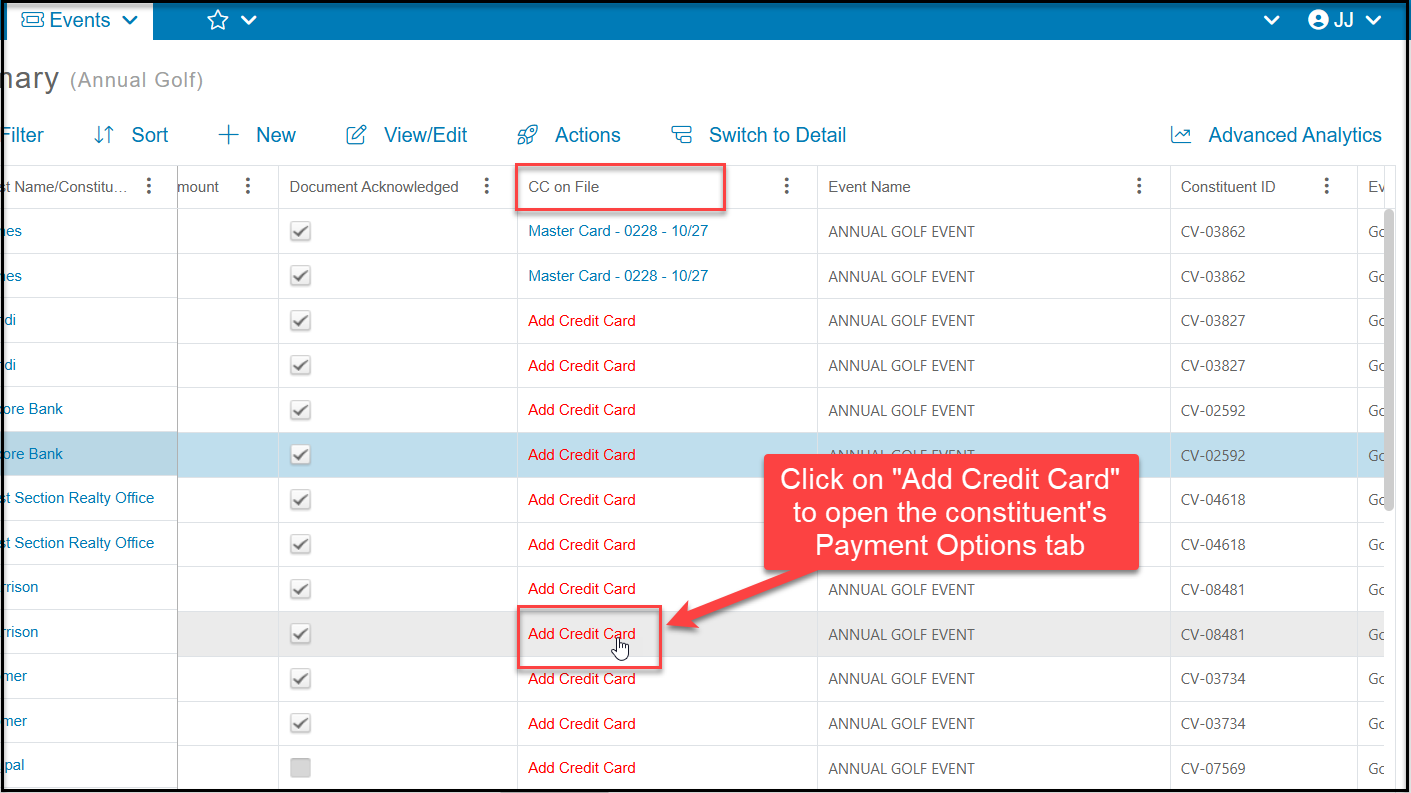
The Events-Summary grid also includes a column to indicate if the registrant has a credit card on file. In the CC on File column you will see the type of card, last four digits and expiration date for the credit card with the farthest expiration date for that constituent.
If they do not have a card on file, you can click the Add Credit Card link on the constituent's row to open their constituent profile record and the Payment Options tab to add a credit card. From the Payment Options tab, you can also send the constituent an email to add or update their credit card information.
Document Confirmed and Survey Results
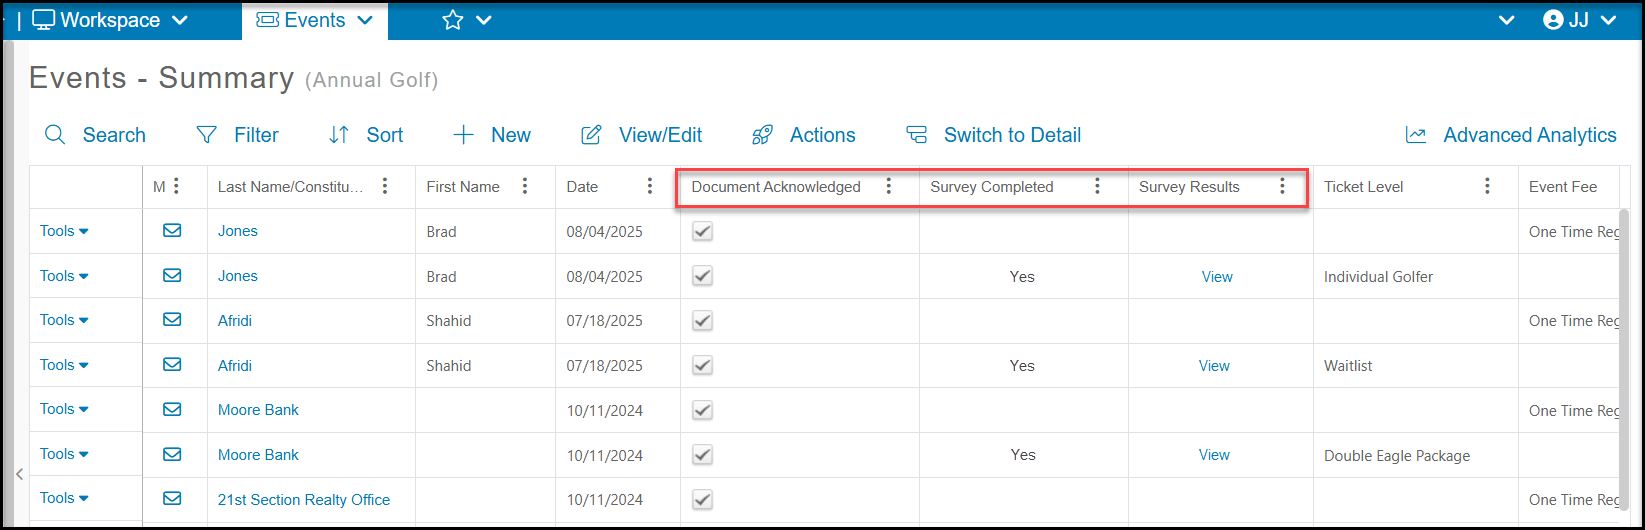
If your event had a document attached or a survey to complete, you can see if those activities were accomplished on the Events-Summary grid.
- Under Document Acknowledged will be a checkmark indicating that the registrant checked the box for a required acknowledgement.
- Under Survey Completed, it will say YES if the registrant successfully submitted their survey.
- Under Survey Results you can find a link to view their survey submission.