You can collect Event Attendee contact information and ask questions via the Attendee Info tab. There are a maximum of 24 Attendee or Event Question Fields that can be added to any event page.
The answers to these questions are shown exclusively in the Event Attendance grid. They do no update constituent profile fields other than name and contact information if a new constituent record is created.
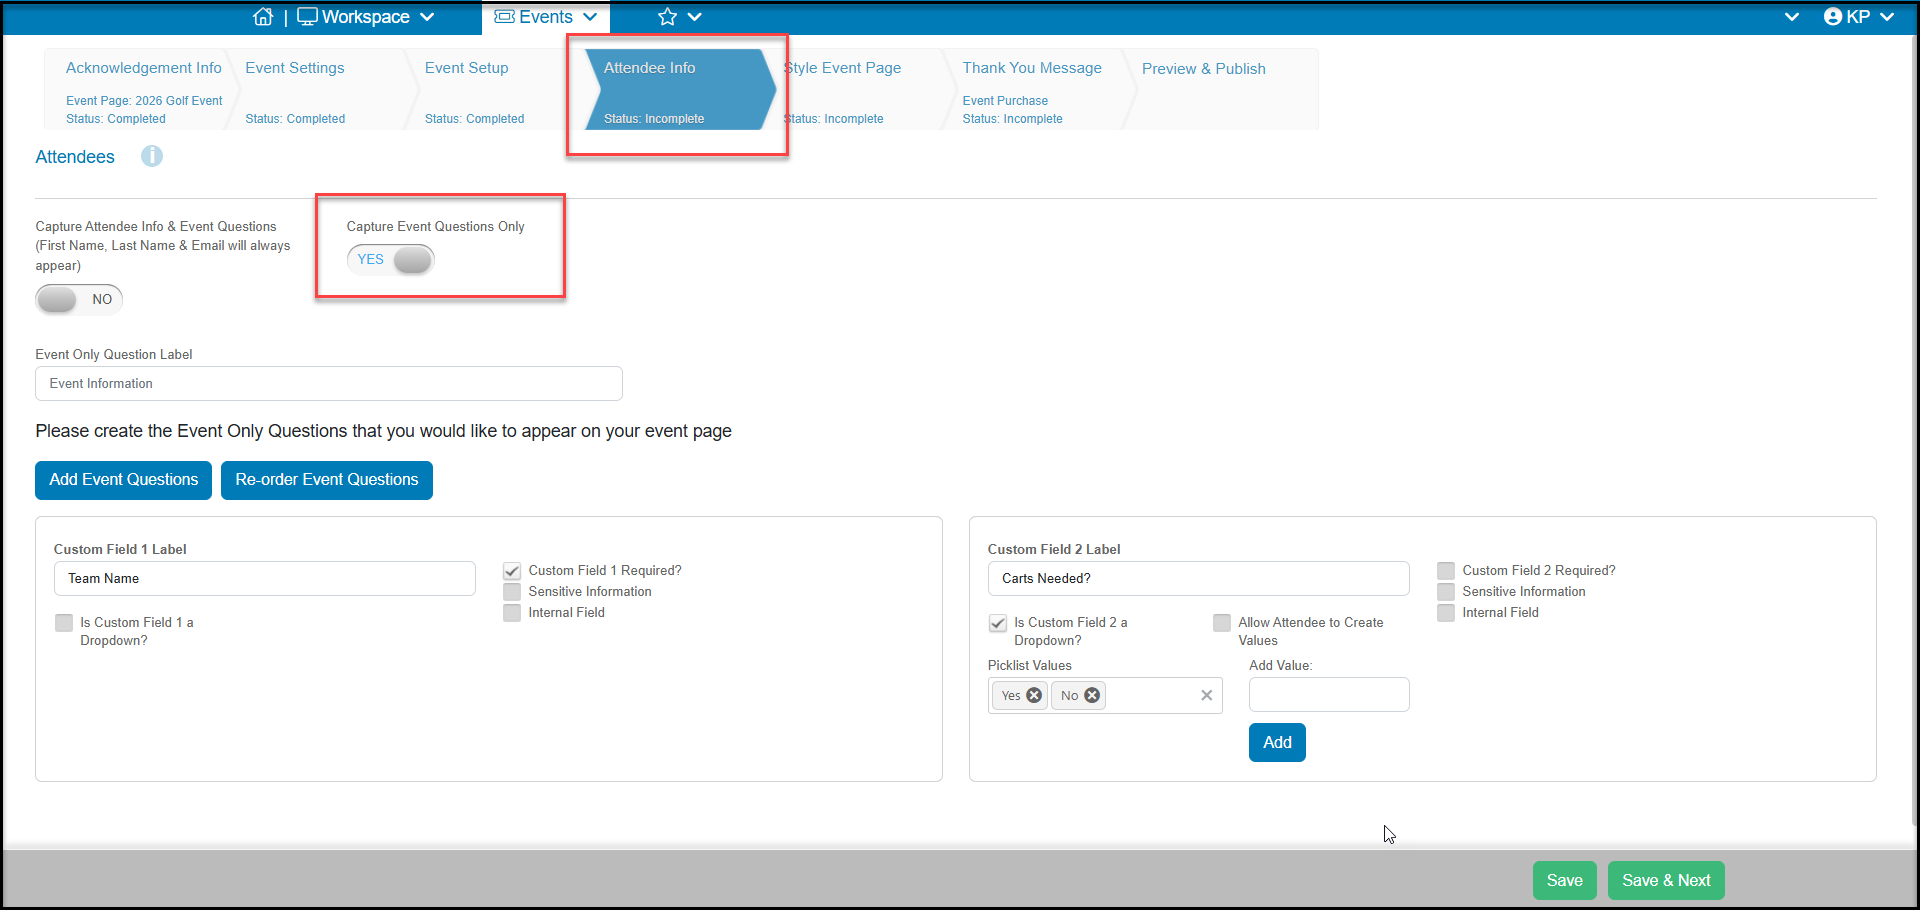
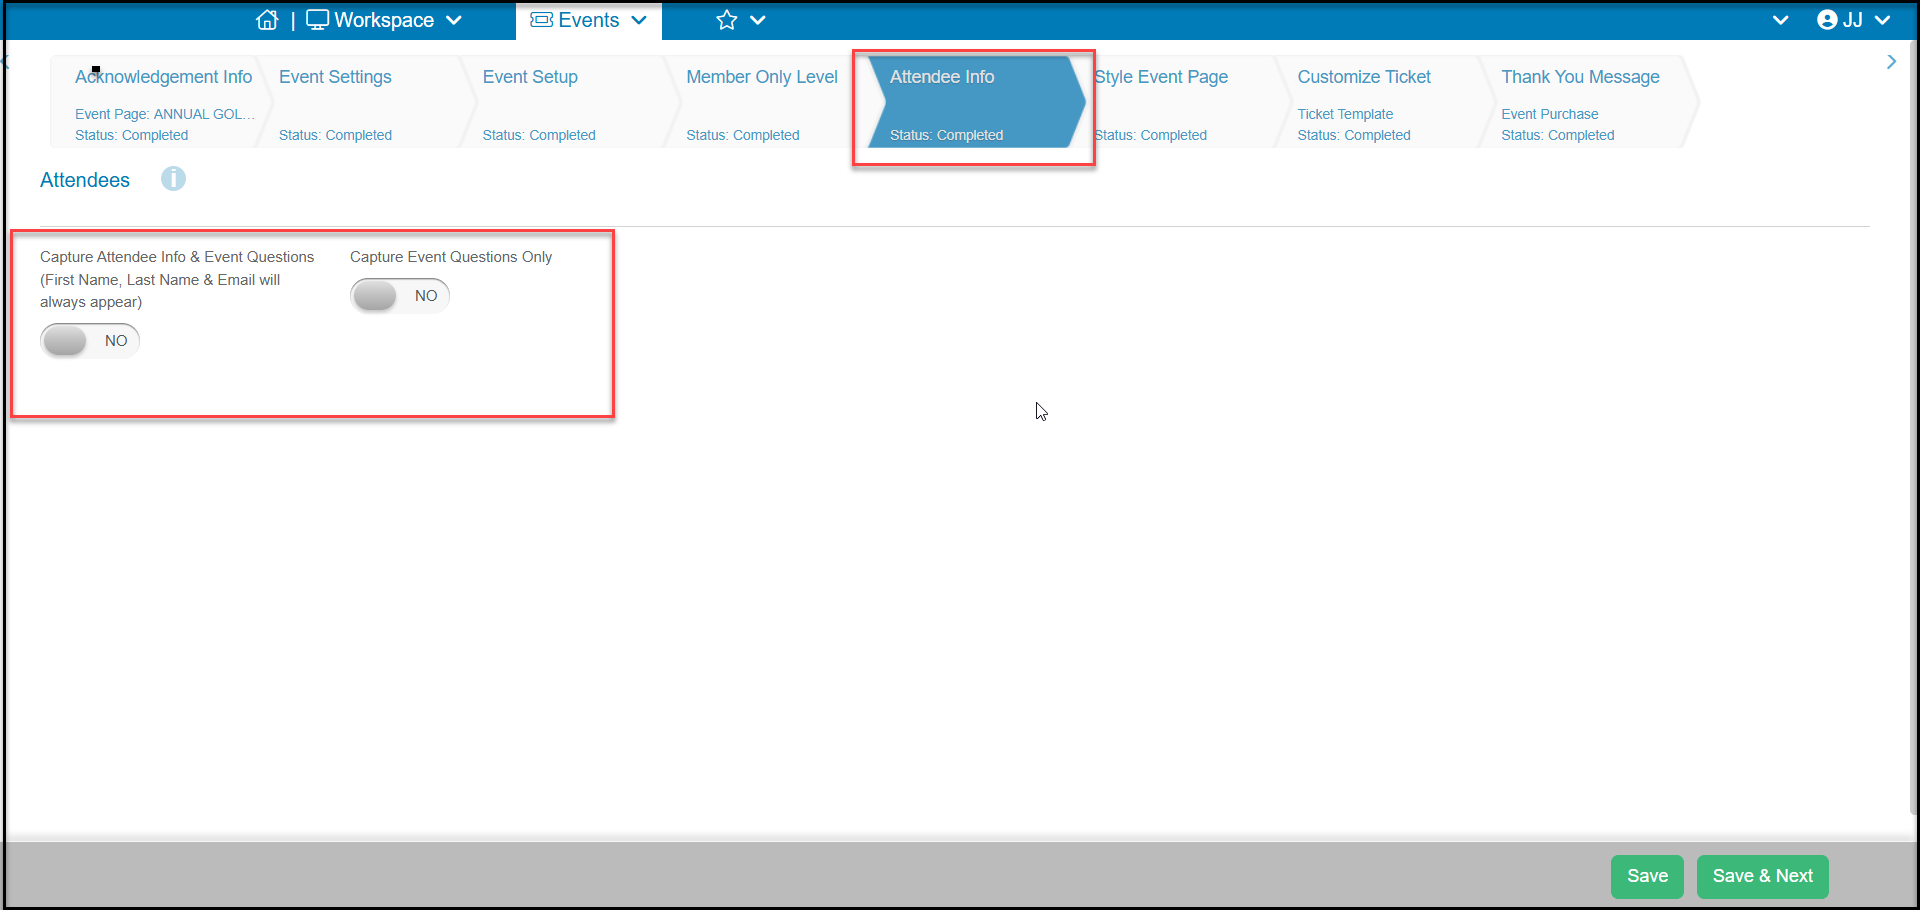
There are two options for collecting information. Only one can be selected at a time, not both.
- Capture Attendee Info & Event Questions - when set to YES you will give the registrant the opportunity to provide the names and contact information of the people who will be attending. Remember that the person or organization purchasing/registering for this event will always be required to provide their contact information at the bottom of the event page. This option allows you to collect the names and information for additional guests. You will also be able to add custom questions for the guests or event-only questions that apply to everyone in the group.
- Capture Event Questions Only - when set to YES, you can ask questions of the registrant that are not linked to specific attendees.
Capture Attendee Info & Event Questions
If you wish to capture information about the individual attendees who will be coming to the event, set Capture Attendee Info & Event Questions to YES.
Attendees will become constituents in your database if they do not already exist. The software will use name and email to match to existing constituents. If it does not find an exact match, a new constituent record will be created.
Capture Attendee Info – When set to YES, Attendee Information will display along with a checkbox: “Click here if some or all your guest information is unavailable.” If unselected, Attendee Information will be required.
Require Attendee Info - When set to YES, Attendee Information (First Name, Last Name & Email) will be required.
Hide Attendee Info on Ticket - When set to YES, Attendee Information will not print on the event ticket.
Capture Attendee Birthdate - When set to YES, Attendee Information will include Birthdate. This field is primarily used for children. When Capture Attendee Birthdate is set to YES, the software tries to match existing constituents using the birthdate, instead of using the email field. This should only be marked YES if you currently collect birthdates for all your constituents or your attendees are primarily children.
Require Birthdate - When set to Yes, Birthdate will be required for Attendees.
Capture Attendee Address - When set to YES, Attendee Information will include Address1, Address2, City, State, Zip, and Country.
Require Attendee Address - When set to YES, Address1, City, Zip, and Country will be required.
Capture Attendee Phone - When set to YES, Attendee Information will include Phone number and Type.
Require Attendee Phone - When set to YES, Phone Number and Type will be required for Attendees.
Allow Attendee to Upload Document – When set to YES, an attendee can upload a document through the form.
Attendee Document Upload Label – This label will display above the button to upload a document on the form.
Use Level Name as Document Category - When set to YES, the name of the Level the attendee is registering for and the document is uploaded under will display as the Document Category of the uploaded file.
Specify Document Category (optional) – Select which Category will be assigned to the uploaded document.
Collect Attendee Company - When set to YES, a field to enter the attendee's company name will be added.
Require Attendee Company - When set to YES, information must be entered in the Company field to complete the form.
Attendee Info Label - This label will display above the attendee information on the Event form.
Attendee Title - This label will appear above each individual attendee fields.

Attendee Fields (Custom Questions)
The next section will allow you to create customer questions that can appear on the form based on which Event Levels are selected by the registrant or are considered "Event Only" and are displayed a single time regardless of the number of Attendees.
To add custom fields/questions to your form, click the blue Add Attendee Fields button. This will add two custom fields at a time. Continue to click the button if you need more.
If you need to change the order of your custom fields/questions, you can click on the blue, Re-order Attendee Fields button. This will launch a dialog where you can drag and drop your custom fields/questions into a different order.
Once you have added custom fields/questions available on your form you are able to populate the following fields.
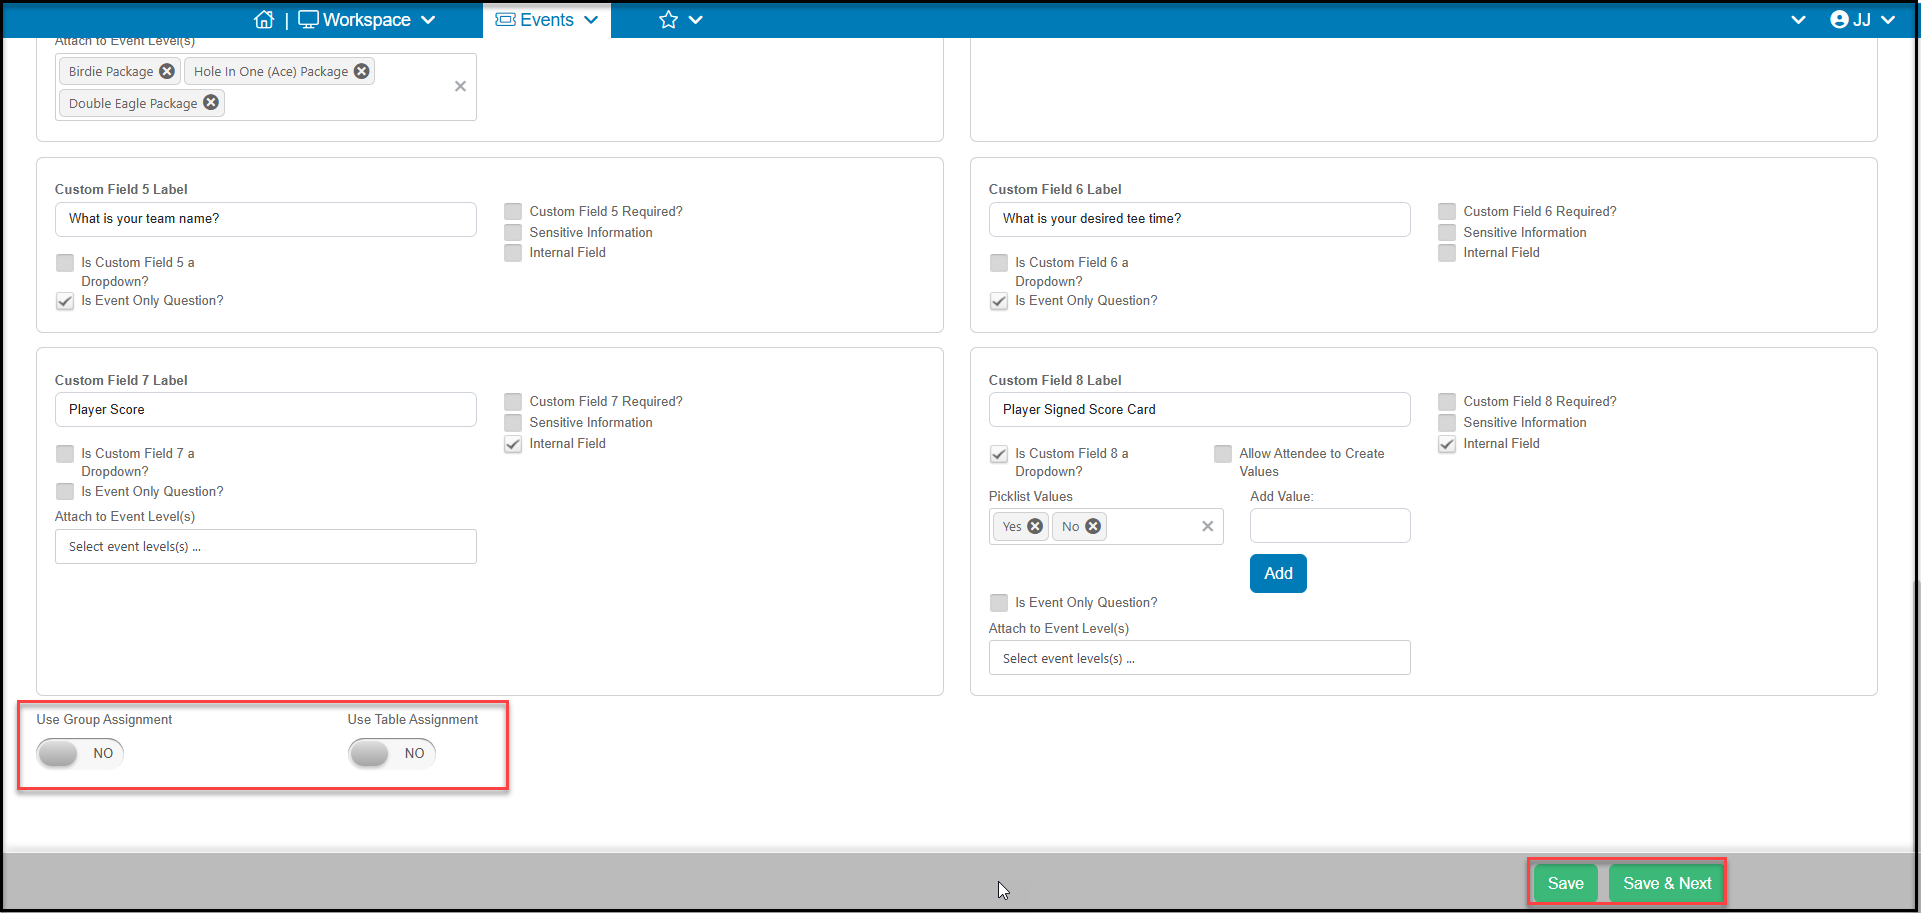
- Custom Field # Label – This label will appear as the question text for this custom field.
- Custom Field # Required? – If checked, the form cannot be submitted without an answer entered for this custom field.
- Sensitive Information – If checked, this information provided will be hidden on the Event and Event Attendance grid. A user designated as an Admin would be able to export the information to Excel to view the sensitive information, however all other users would still only see Sensitive Info if they exported the data.
- Internal Field - If checked, these questions are visible only on the Event Attendee grid, not on the event registration page. These fields are updated using the edit icon on the Event Attendance grid and can be updated for each attendee.
- Is Custom Field # a Dropdown? – By default, after the question will be a text field for the registrant to provide an answer. However, if you check this box the answer will change into a Dropdown field. You can populate custom values for the answer to this question. Only one selection can be made from the dropdown picklist.
- Picklist Values – These values will appear in the picklist for this custom field. If you wish to remove a listed value, click the “x” next to that value.
- Add Value: – Enter in the value you wish to add to the picklist, click the blue Add button to add the new value.
- Picklist Values – These values will appear in the picklist for this custom field. If you wish to remove a listed value, click the “x” next to that value.
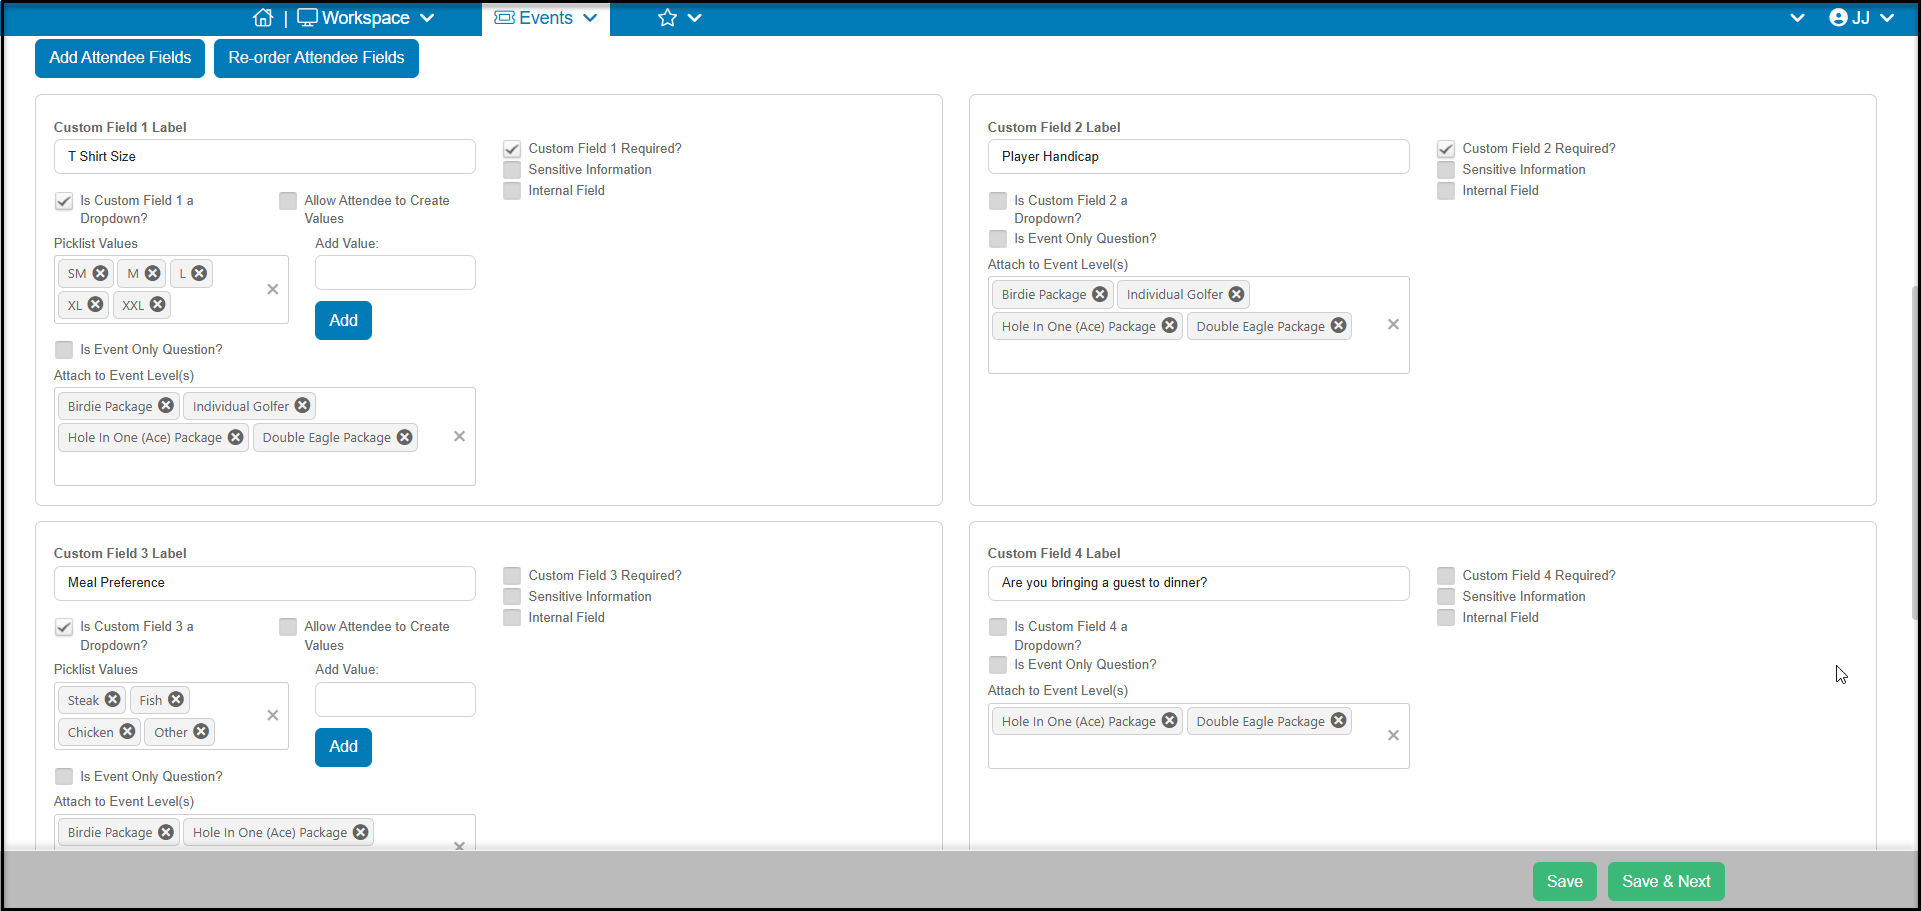
Next you will determine whether each question is specific to an attendee or if it applies to everyone who is attending. A specific attendee question would be something like "What is your t-shirt size?" An Event Only Question is one like "What is your golf team name?" since it applies to all the attendees.
- Is Event Only Question? – If checked, this question will appear once on the event form for all registrations regardless of Event Level or number of attendees.
- Attach to Event Level(s) – If this is not an Event Only Question (the box is not checked), then you are able to select which Event Levels this question should be attached too. When a registrant selects that connected event level, the questions appear on the form per attendee. In the example above, all attendees are asked what their t-shirt size is, however only those who purchased the special packages will be attending the luncheon. Therefore, the Individual Golfer level is not included for those questions “Meal Preference” and "Are you bringing a guest to dinner?".
Once all your questions have been added, you also can determine if the attendees will be assigned groups using the Use Group Assignment or the Use Table Assignment buttons. You must collect attendee info to use these features. They cannot both be “YES,” however you can elect not to use either option by leaving both marked NO.
Click Save & Next at the bottom of the page to continue to the next step.
Capture Event Only Questions
If you do not need the details for the individual guest names, you can still ask questions of the registrant using the Capture Event Questions Only option. With this option set to YES, you can:
- Add a custom label to the fields with the Event Only Question Label.
- To add questions to your form, click the blue Add Event Questions button. This will add two custom fields at a time. Continue to click the button if you need more.
- If you need to change the order of your questions, you can click on the blue, Re-order Attendee Fields button. This will launch a dialog where you can drag and drop your custom fields/questions into a different order.
- Similar to how you add questions for attendee info, your questions can be required, marked as sensitive, or for internal use only.
- You can create a custom drop down option as well.
- Event Only questions cannot be tied to specific ticket levels and will be visible for all registrants.
Click Save & Next at the bottom of the page to continue to the next step.