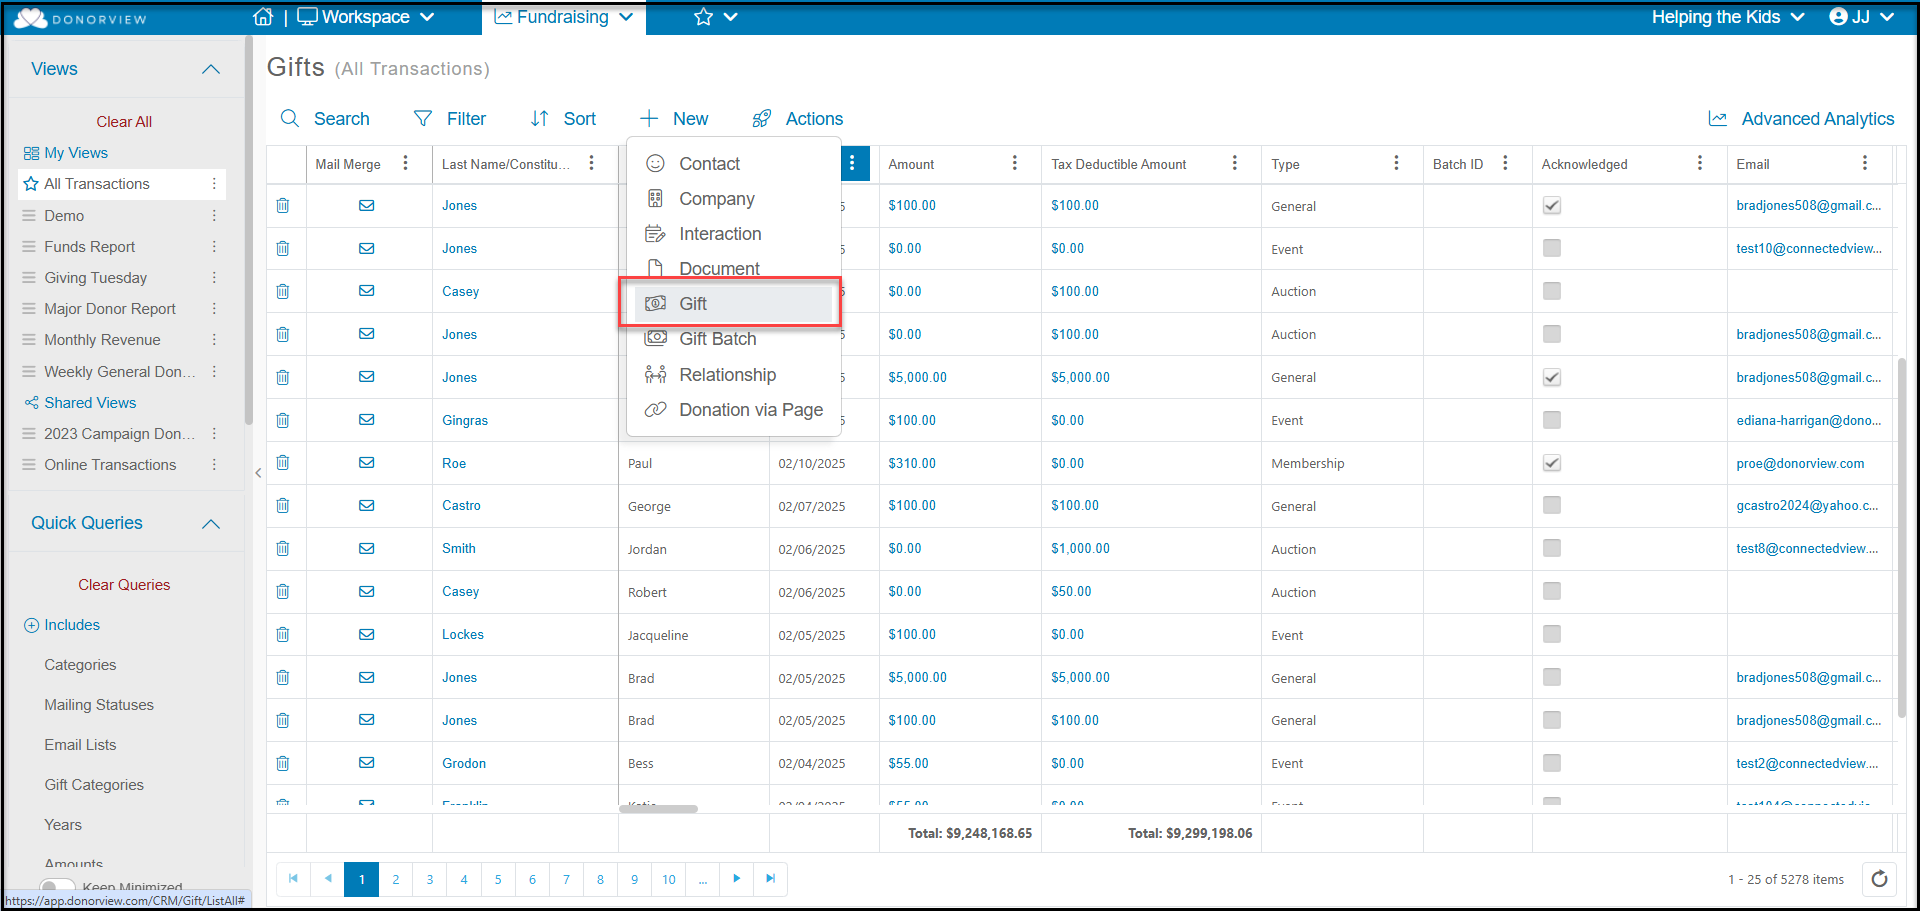
There are multiple ways to create a new gift.
Gifts can be added from any of the main grids in the CRM Module including Constituents, Interactions, Documents, or Relationships, as well as from the Gifts Grid in the Fundraising Module, and from the constituent’s record. To add a gift from the grids, hover over +New and click on Gift to open the gift entry page.
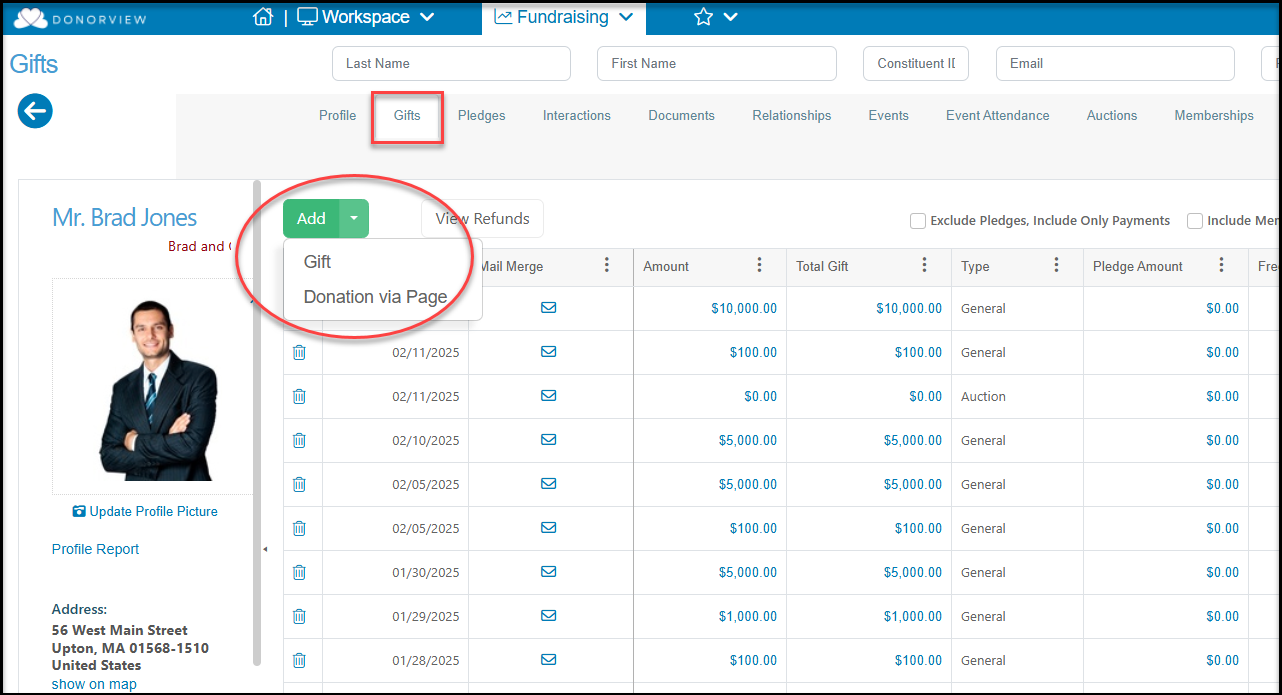
From the constituent’s record, go to the Gifts Tab and click on the green Add button to either open a gift entry page by clicking on Gift or add a gift by Donation via Page if paying with a credit card. Donation via Page will open a menu to select the appropriate donation page.
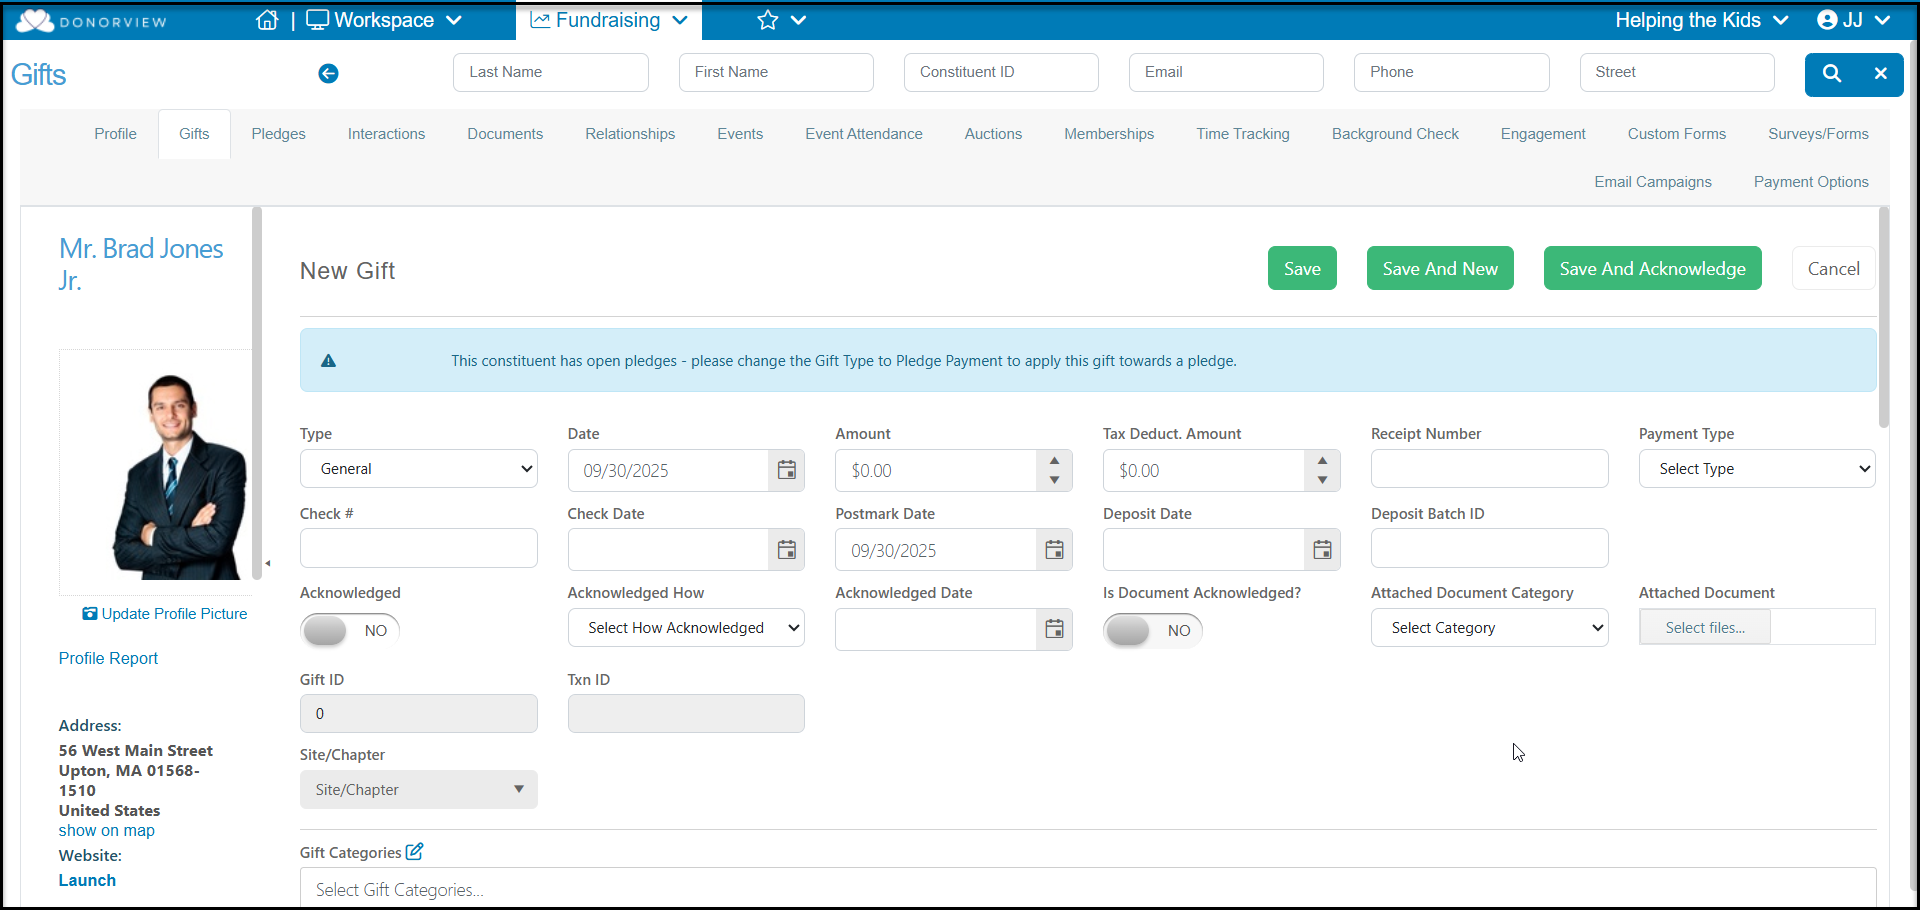
Step 1 - Date & Amount
At the top of the page, you will find the following fields (note that only the Type, Date, Amount, and Payment Type are required fields):
Type - This is the selection of what kind of transaction this is. For a single, one-time donation select "General"," which is the default setting. Note that this field cannot be edited once the transaction is saved. If this was accidently entered as a General donation, but should have been a Pledge Payment, the transaction will need to be deleted and re-entered.
Date - This is the date the transaction was originally entered. You should not enter dates in the future in this field, contributions committed for a future date are pledges and should be entered as such. If necessary, you can record a date in the past, but you also have several other date fields for tracking things like postmark, check date or deposit date.
Amount - The total amount received for this contribution. It will be possible to split the gift into different revenue categories farther down the page if needed.
Tax Deduct. Amount - This will default to the same as the Amount. You can edit this as needed.
Receipt Number - A text field where you can enter any value you like. It will remain blank unless you enter a value.
Payment Type - select how the money was paid. This is a dropdown menu that you can edit to add more options if desired. Do not change the names of the Online payment options as these are tied to bank deposit statements. There is an option to process a credit card from here as well. Selecting Credit Card from the dropdown list will add new fields to process a donation using a credit card.
Check # - If paid by check, you can enter the check number.
Check Date - If paid by check, you can enter the check date.
Postmark Date - The date the donation was postmarked on the envelope. It defaults to the Date of the transaction entry.
Deposit Date - The date the contribution was deposited. You can future date this if for example you are entering donations on Wednesday, but you do all your deposits for the week on Friday.
Deposit Batch ID - For credit card transactions, this field will be auto-populated. For all other manually entered transactions, you can enter an ID in this field if desired.
Acknowledged - This toggle is used to identify if a contribution has already been acknowledged. For donation, event, auction, and membership pages, you can set this to automatically be updated when the automated thank you email is sent. For manually entered gifts, you have the option of marking it as YES if the acknowledgement was already sent or creating a thank you letter immediately after entry or in a batch with other donations.
Acknowledged How - Indicate the method used to send the thank you message. This is an editable dropdown menu.
Acknowledged Date - Date the transaction was acknowledged.
Is Document Acknowledged? - If the donation, event, or membership page required a document acknowledgement, this box will be checked if the constituent completed this task.
Attached Document Category - If you would like to attach a document to this transaction record, you can select which document category the attached would be assigned to.
Attached Document - You can select a file to attach to this record. The document will also be saved in the constituent's Documents tab and be available in the Documents grid.
Gift ID - An auto-populated field for a unique Gift ID for this transaction.
Txn ID - An auto-populated field for credit card transactions.
Site/Chapter - Can be selected if Sites/Chapters is activated for your organization.
Step 2 - Revenue Categories
In the next section on the gift entry page are the fields to categorize this revenue for financial reporting. There is also an option to split a contribution into different revenue categories. Note that revenue categories and the other fields are not required. However, using them will greatly enhance your ability to create detailed financial reports from the Gifts grid and you can use them in any combination that suits your financial reporting needs. Revenue categories are also required if you are using the QuickBooks integration.
The revenue category fields include:
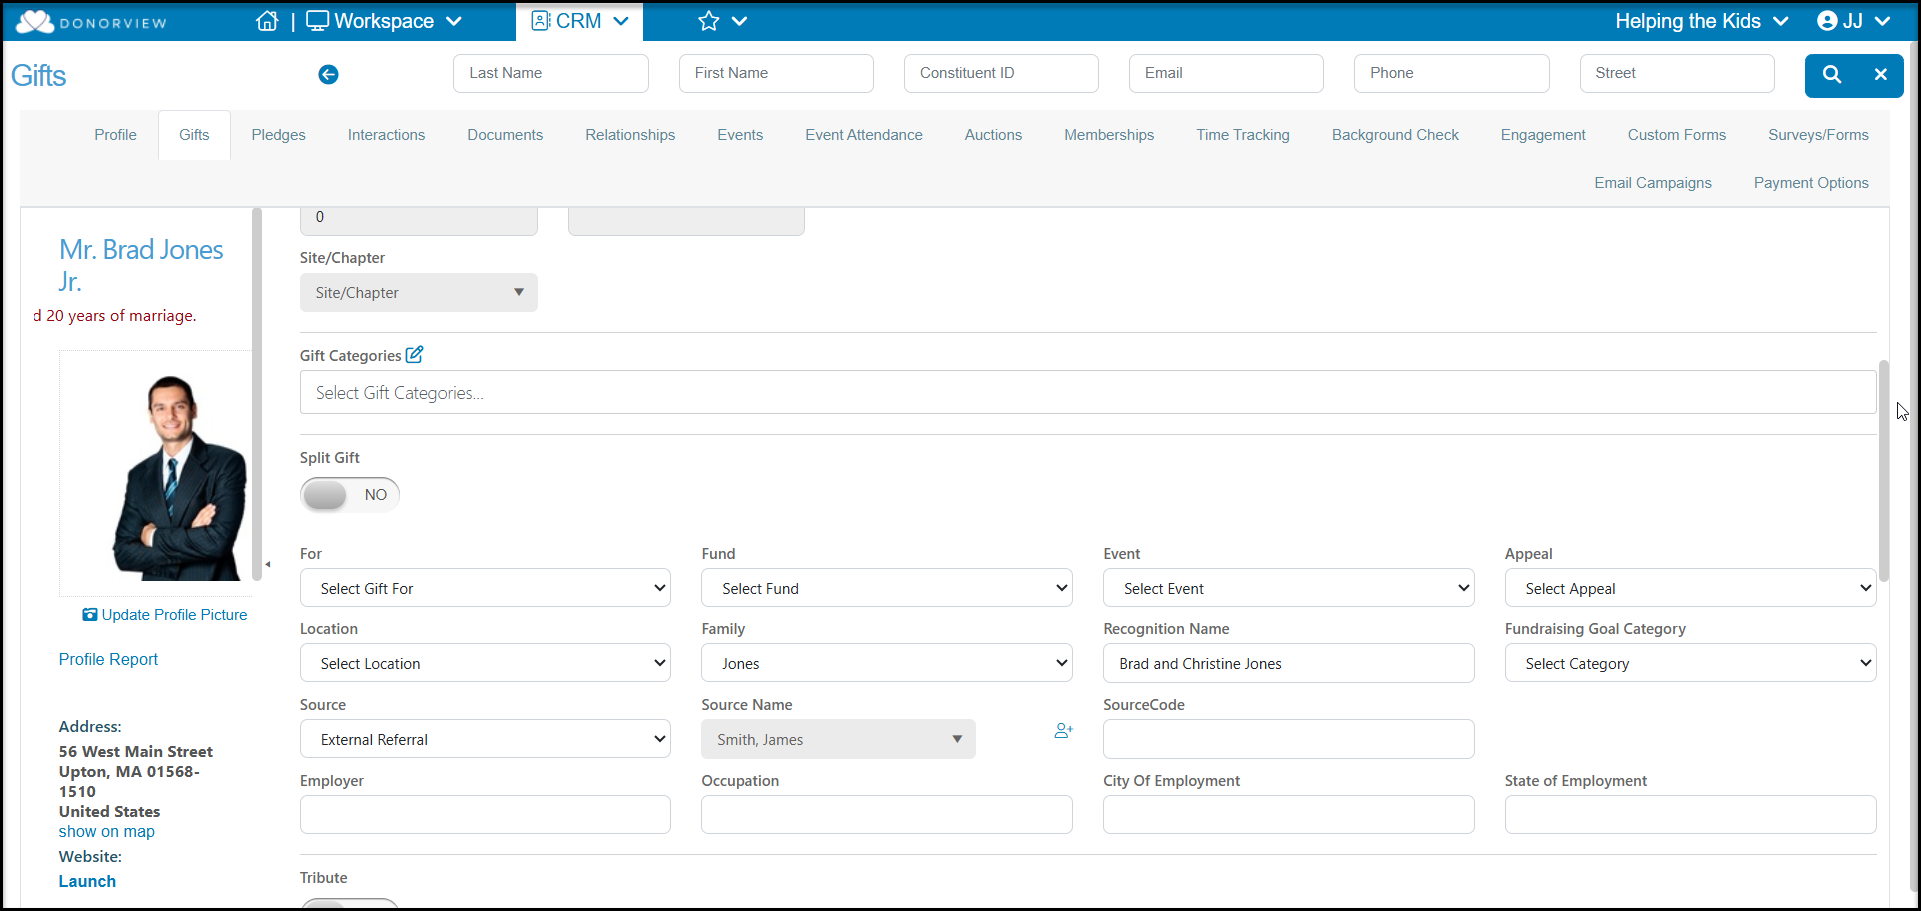
Gift Categories - This is a multi-select field which can include multiple gift categories to be assigned to this transaction. The Gift categories field is generally used to identify different attributes of the donation, such as Donor Advised Fund, Employee Giving, or other category you would like to assign. Gift categories are editable using the pencil & paper icon.
For - Used to identify what this contribution will be used for. For example, the project, program or activities this money will go towards supporting. This is an editable dropdown field that you can create, edit, assign, and use as desired. This field is also used for exporting data to QuickBooks.
Fund - Used to identify what fund this contribution will be designated or deposited into. For example, the bank account or accounting ledger account. This is an editable dropdown field that you can create, edit, assign, and use as desired. This field is also used for exporting data to QuickBooks.
Event - Used to identify what event this revenue is associated with. For example, ticket sales, auction revenue, and paddle raise donations can all be assigned to the Gala event to combine revenue from multiple transaction types for reporting. This is an editable dropdown field that you can create, edit, assign, and use as desired. This field is also used for exporting data to QuickBooks.
Appeal - Used to identify how this contribution was solicited. For example, an annual appeal letter, a written proposal, a social media campaign, a board member, or unsolicited. This is an editable dropdown field that you can create, edit, assign, and use as desired. This field is also used for exporting data to QuickBooks.
Location - Used to identify what location where this contribution should be directed. If you do not have multiple locations, this field can be blank. This is an editable dropdown field that you can create, edit, assign, and use as desired. This field is also used for exporting data to QuickBooks.
Fundraising Goal Category - Used to update goal progress widgets like thermometers, donuts, and bar charts to show how much money you have raised so far towards your goal. These goal progress widgets can be included on donation, event, auction, and peer to peer campaign pages as well as widgets created to use on your organization's website.
Other fields include:
Family - If this field is used on the constituent's profile page, it will auto-populate the information in the donation record.
Recognition Name - Auto-populated from the constituent's profile page and typically used for annual reports, but you can edit this as needed. Note that editing on the gift entry page does not affect the constituent's profile page.
Sources - A dropdown list to identify the source of this contribution.
Source Name - A search field to select the name of another constituent who referred or solicited this contribution. If the constituent is not in the database yet, the small head icon will allow you to do a Quick Add for the new constituent record. Once added, the new constituent can be found in the search box.
Source Code - A text field to enter an alphanumeric code used for the solicitation.
The following fields are used for contributions to Political Action Committees and other political and lobbying organizations. These types of contributions are not tax-deductible and have different rules regarding reporting. These fields can be activated on the Donation Page setup and are only linked to the donation. They do NOT update any information on the constituent's profile page and are maintained in the contribution record only.
- Employer
- Occupation
- City of Employment
- State of Employment
Optional - Split Gifts
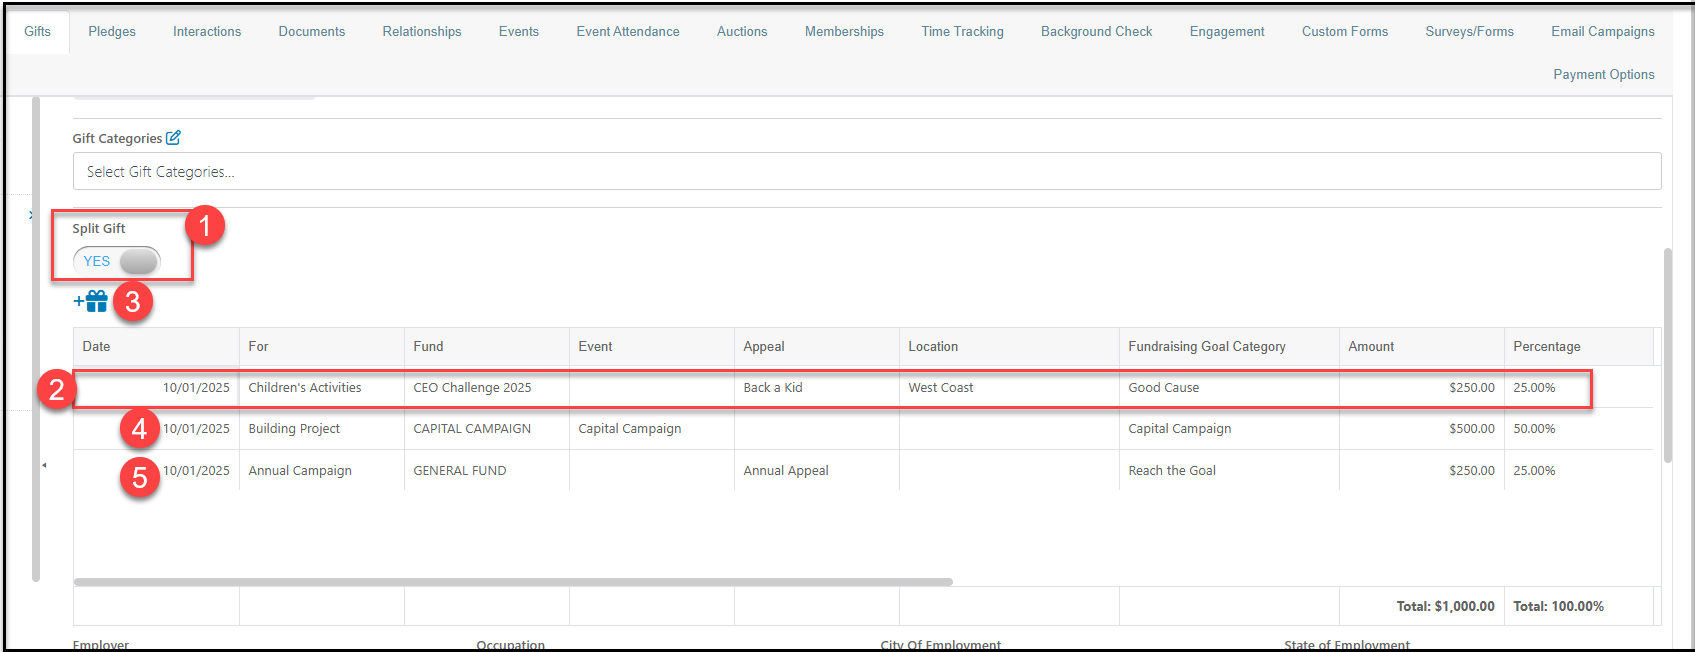
There is an option to split a gift entry into various For-Fund-Event-Appeal-Location-Fundraising Goal (FFEALF) revenue categories. In the example below, the organization received a $1000 donation and the donor requested that it be split three ways.
- Begin by setting Split Gift to YES.
- In the top line, enter the appropriate revenue categories and amount for the first split.
- Then click on the gift box icon to add another row to the split.
- Enter the appropriate revenue categories and amount for the next split.
- Click the gift box icon again to add another row and enter the appropriate information
When finished entering all the appropriate rows for the split, the total should be equal to the Amount at the top of the page and the percentage should be 100%.
By recording a split gift, there will be one Gift ID associated with this record shared by each of the rows. On the constituent's Gifts tab and on the Gifts grid, this transaction would appear with three separate lines showing the amounts for each of the FFEALF revenue categories so that reports will correctly reflect how much money was applied to each category. Split gifts are also identified with a check mark in that column on the grids.
Clicking on any of those rows will re-open the split gift to see the original entry.
Step 3 - Special Types of Contributions & Notes
There are separate articles to cover the details for entering and acknowledging these special types of contributions. This list will just familiarize you with what the toggles are for.
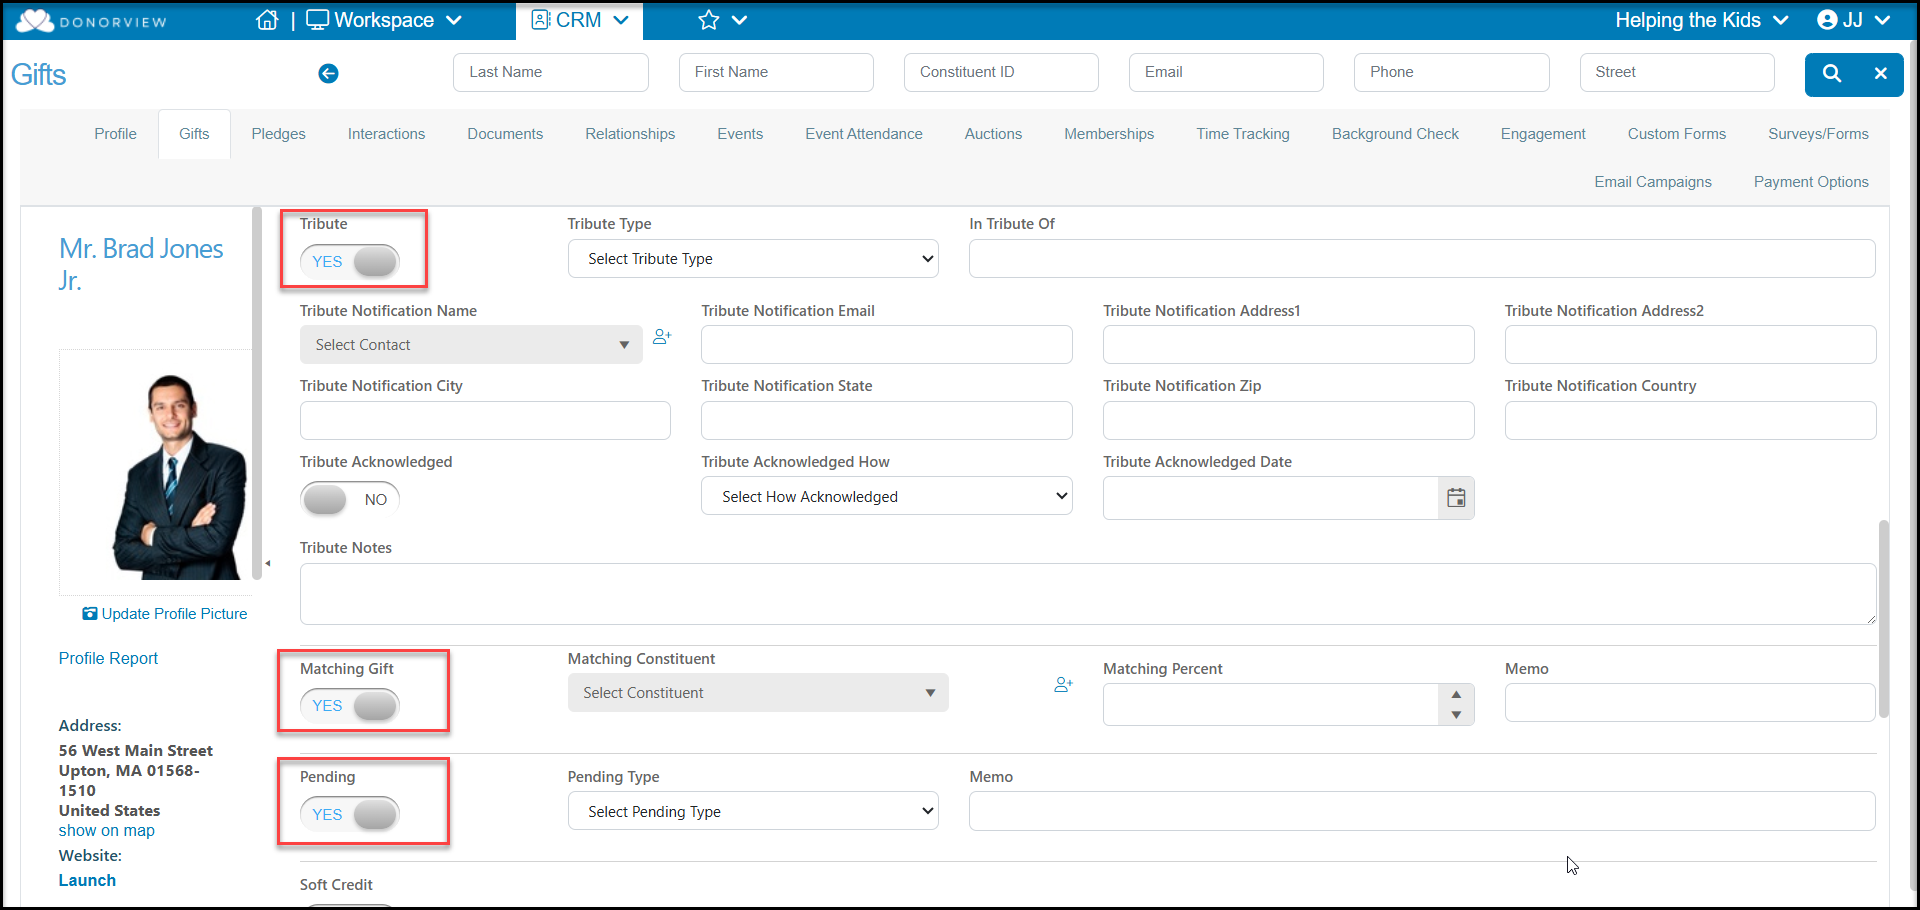
Tribute - For recording contributions in honor or memory of another person or organization.
Matching Gift - For recording a potential matching gift from the constituent's employer or other organization associated with the constituent.
Pending - For transactions recorded via a donation, membership, event, peer to peer, or auction page this toggle will be marked YES. For credit card transactions, the toggle will automatically turn off when the card is processed and the money is deposited into your organization's bank account. For all manually entered transactions for check or cash, the toggle will remain YES unless you choose to change it to NO.
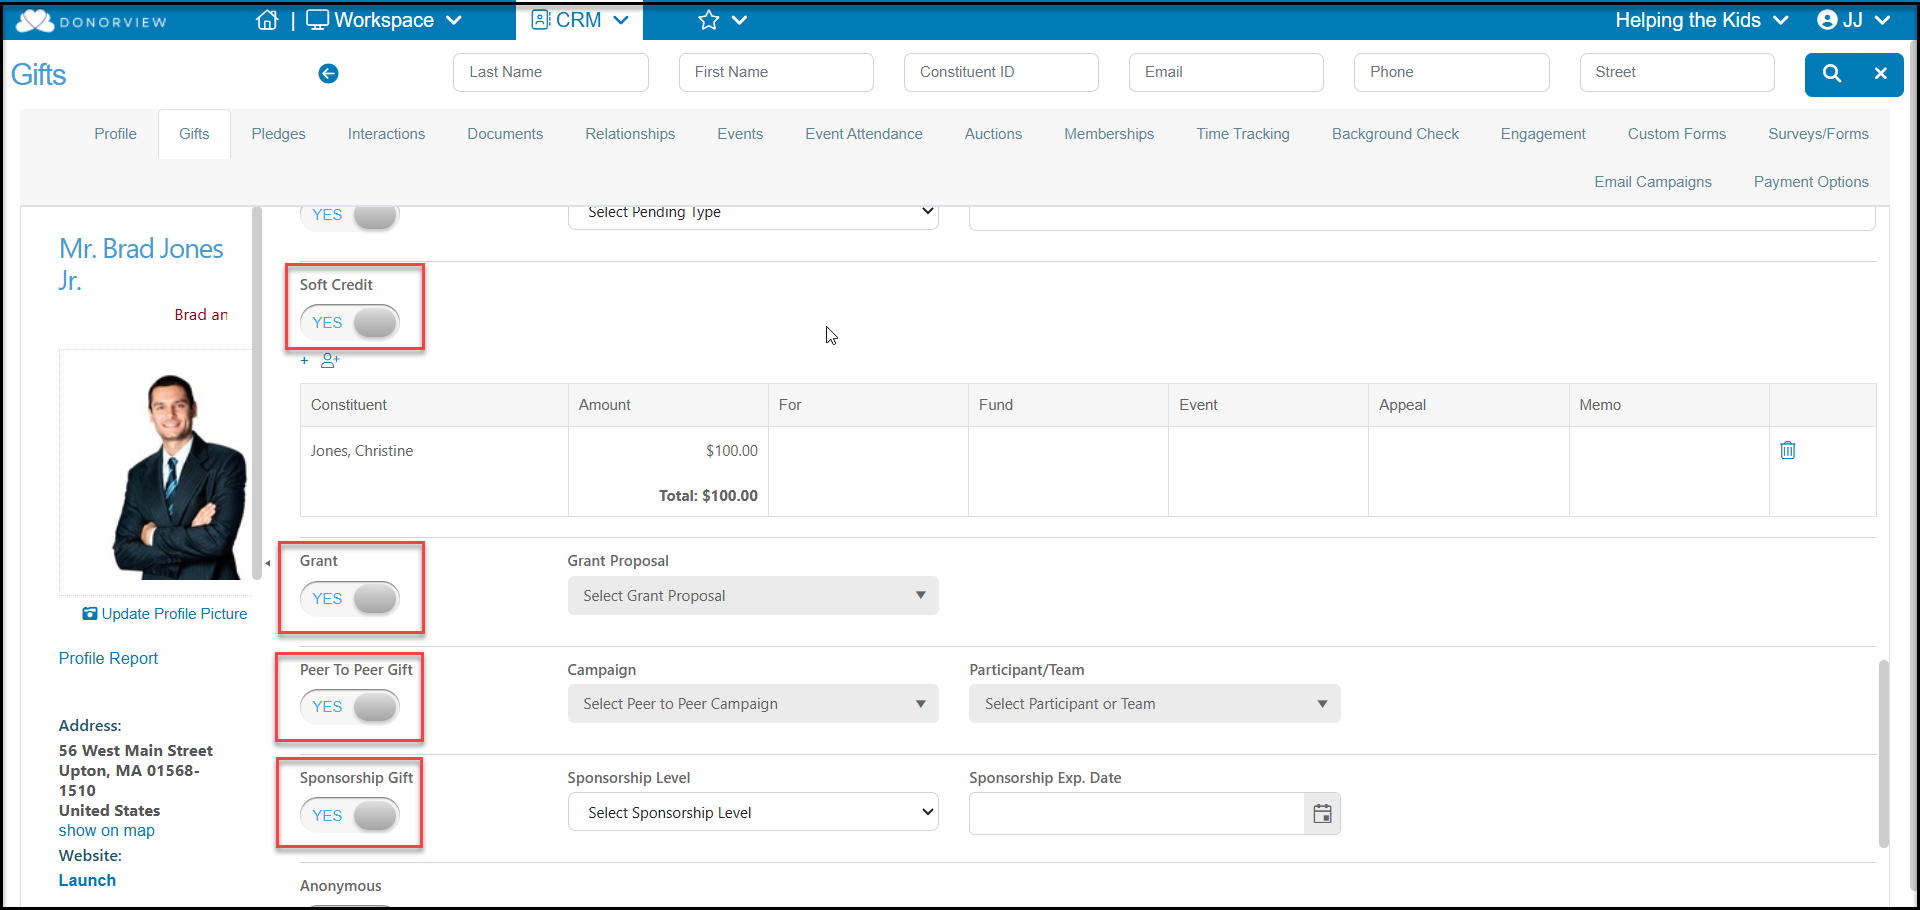
Soft Credit - Allows you to record a soft credit for another constituent.
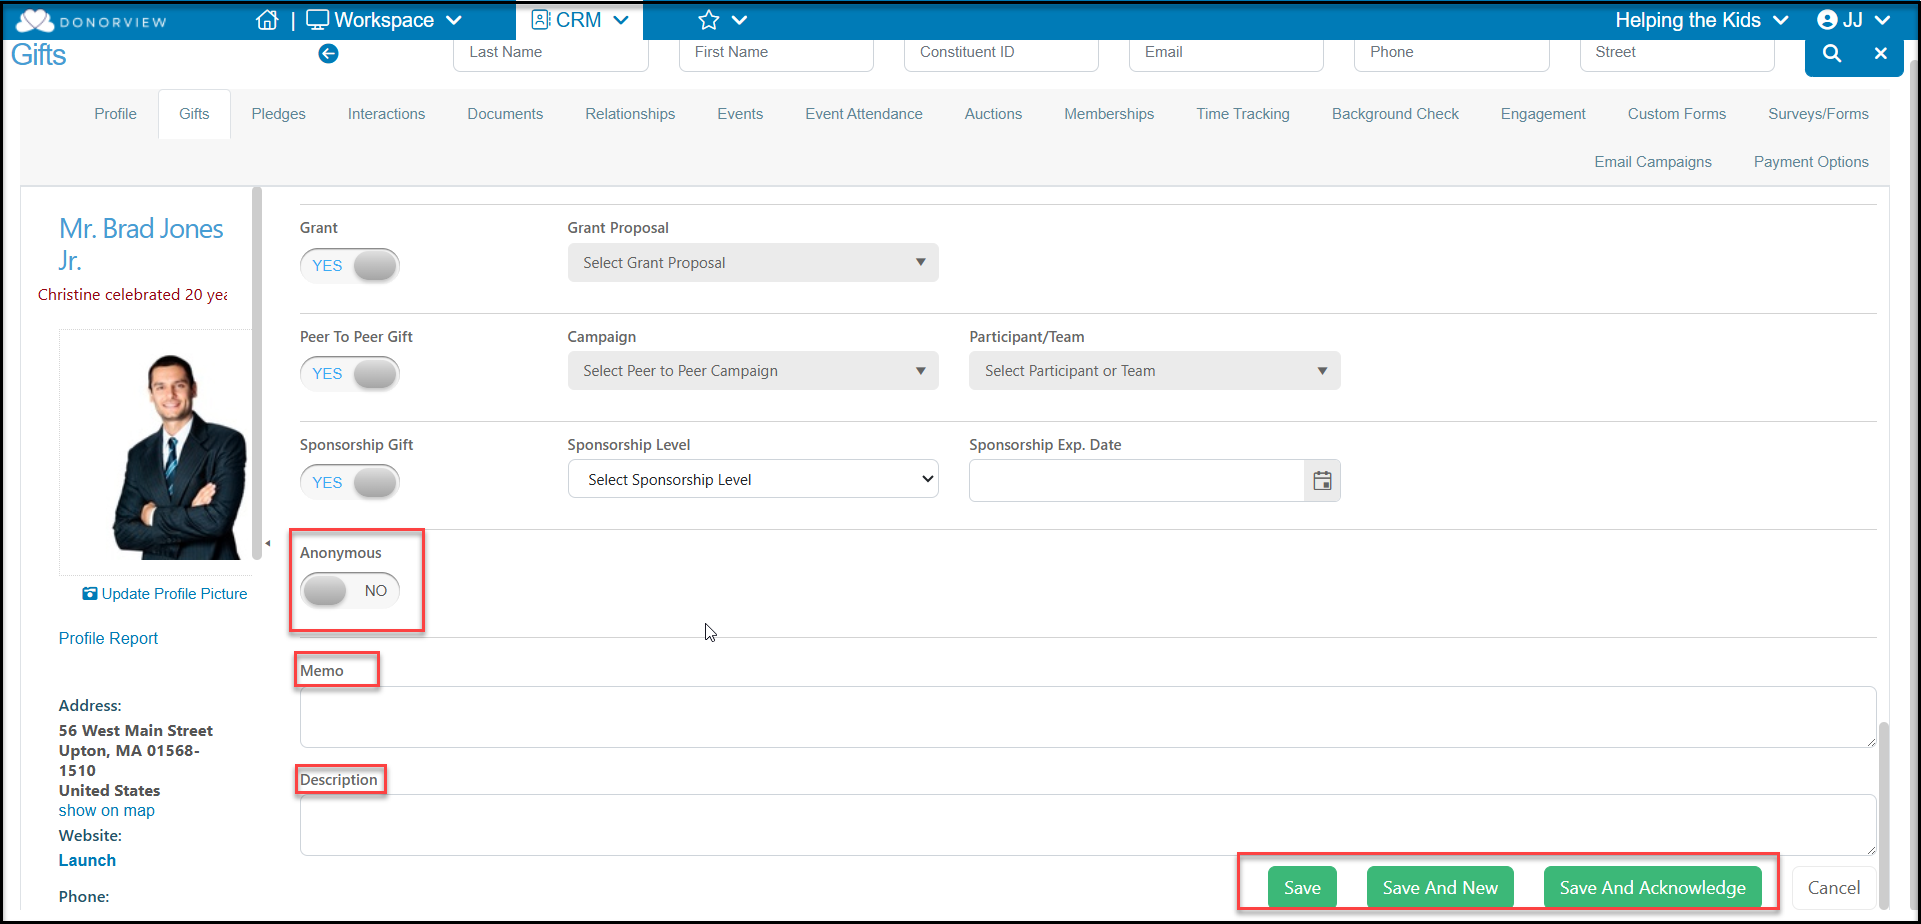
Grant - To link an awarded grant proposal to this contribution.
Peer to Peer - To designate this gift to a Peer to Peer Campaign and a particular participant or team.
Sponsorship Gift - To link this contribution to a Sponsorship level. It will also initiate any tasks you have associated with that sponsorship level.
Step 4 - Save & Acknowledge
Anonymous - At the bottom of the page is an opportunity to mark the donation as Anonymous if desired. This only adds a checkmark to a column on the Gifts grid, it does not hide the contribution from the list. If you wish to exclude anonymous donors from reporting, be sure to mark their constituent profile page as “Gives Anonymously” and exclude them from any reports using a filter on that field.
Memo - On donation, membership, and event pages there is an option to include a memo field for the transaction. If the constituent enters anything into that field, it will appear in this field on the transaction. For manual transactions you can enter information in this field as desired.
Description - Another text field to include additional information about this contribution. Both the Memo and Description fields are also available on the Gifts grid for searching and reporting.
Once you have completed making all your selections and entering the information for this contribution, you have the following options at the top and bottom of the page.
Save - Saves the record. You can manually acknowledge later in a batch with other donations as needed.
Save and New - Saves the record and opens a new window for the same constituent to enter another contribution. No acknowledgement is sent yet, this must be done manually later.
Save and Acknowledge - Allows you to save the donation record and generate your acknowledgement (thank you) letter. You will have the option to send it via snail mail or email.
Note that donations and purchases made through a donation, membership, event, auction or peer-to-peer campaign online page automatically receive a thank you email that can serve as their acknowledgement.