On the Schedule tab of your Automated Action setup you will be able to create a tigger. This trigger will tell the software when and under what circumstances to send out the automated notification. Scrolling down past the Campaign Summary and Distribution Method you will find the settings for the trigger. Below are a list of the available settings and their description:
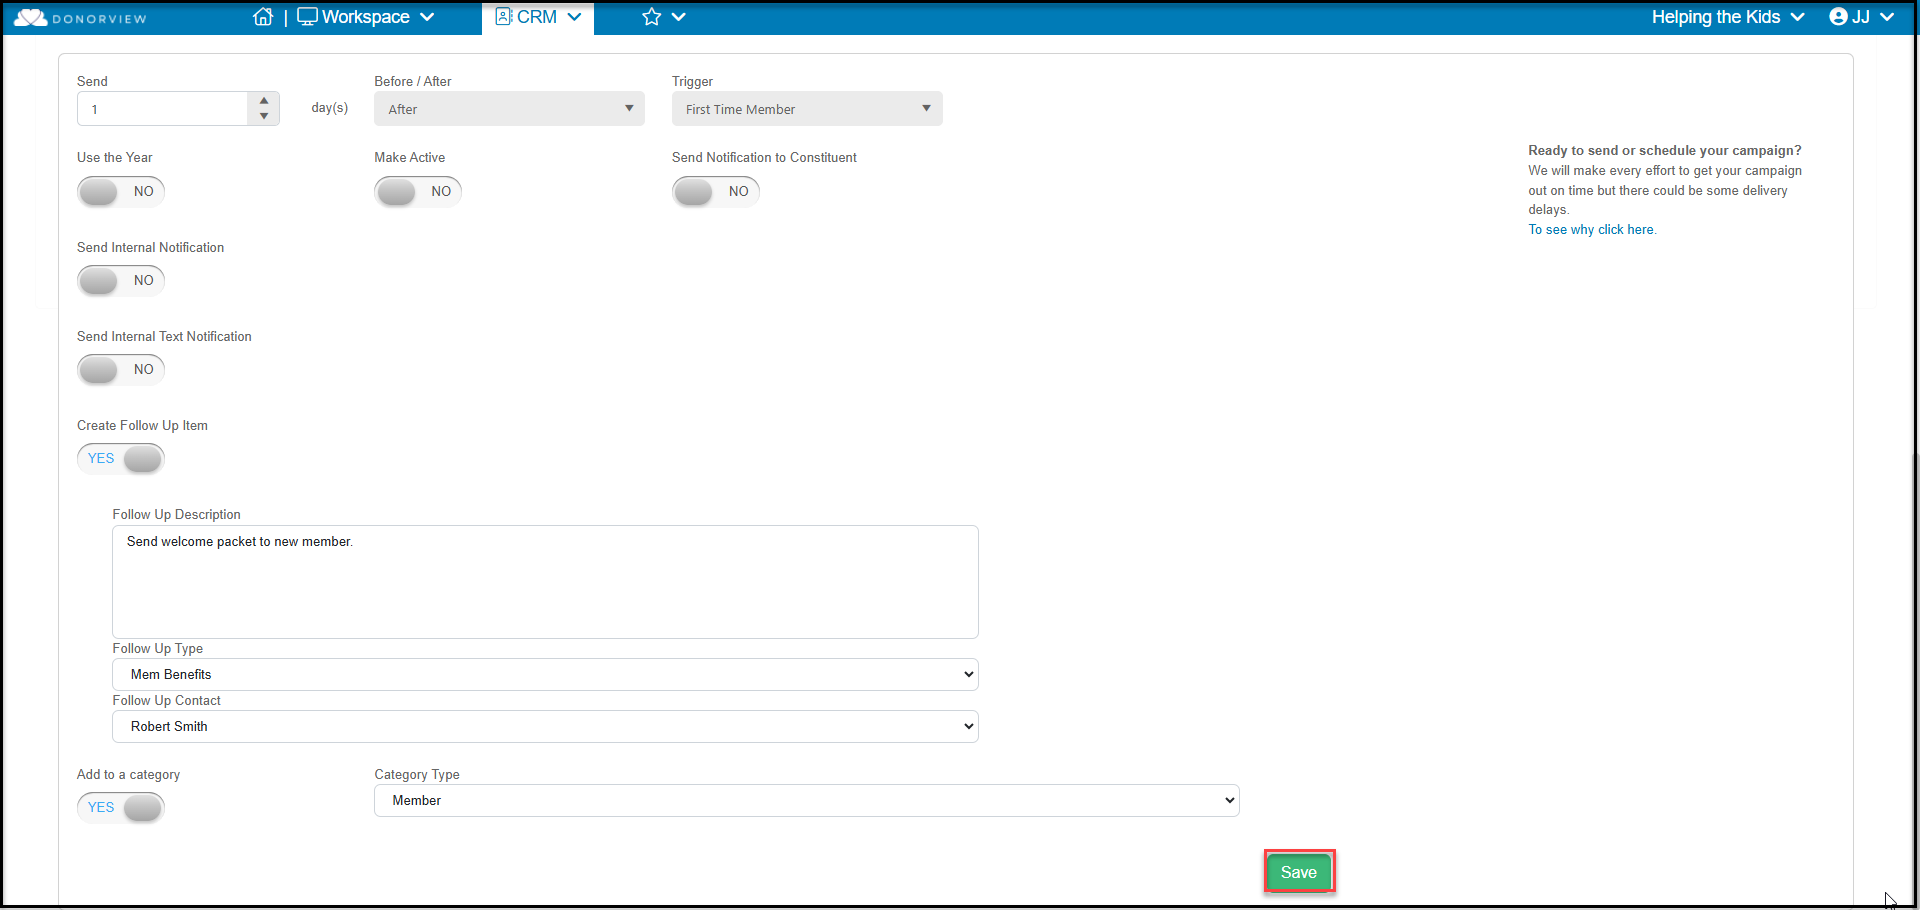
- Send - Enter how many days before or after the trigger take place this notification should be sent.
- Before/After - Select whether the notification should take place "Before" or "After" the trigger take place
- Trigger - Select what the trigger or event is that will cause the notification to be sent.
The available triggers are as follows:
Before:
- Birthday - Use the birthdate listed for the constituent as the trigger
- Custom Date Field - Custom Date fields can be added to a constituent's profile and can be used as a trigger.
- Custom Date/Time Field - Custom Date/Time fields can be added to a constituent's profile and can be used as a trigger.
After:
- Date of Introduction - Use the date listed for a constituent's date of introduction
- First Time Donor - Use the first gift for a constituent as the trigger
- Single Day Gift - Enter the amount that if given by a single constituent in a single day that will act as the trigger
- Year to Date Gift Amount - Enter the amount that if given by a single constituent during this current calendar year that will act as the trigger
- Fiscal Year to Date Gift Amount - Enter the amount if given by a single constituent during this current fiscal year that will act as the trigger
- Cumulative Gift Amount - Enter the amount if given over the lifetime of a constituent will act as the trigger
- First Time Member - Use the first Membership purchase by a constituent as the trigger
- First Time Gift Amount - Enter the amount if given as a gift by a constituent that will act as the trigger
- Cumulative Gift Count - Enter the total number of transactions given by a constituent that will act as the trigger
- Constituent Creation Date - Use the day a constituent's record was created in your account as the trigger
- Primary Relationship - Use the day a Primary Relationship was assigned to the constituent as the trigger
- Total Time Records - Enter the total amount of Time Tracking hours attached to a constituent as the trigger
- Saved Constituent View - Select a saved view created on your CRM Constituent grid. As new constituents are added to the selected view based on the queries and filters you include in your view, the automated action will be triggered. For example, if you create a view to show all constituents who have a cumulative event attendance of three or greater, anytime a constituent reaches three events attended, the trigger will be activated.
- Custom Date Field - Custom Date fields can be added to a constituent's profile and can be used as a trigger
- Custom Date/Time Field - Custom Date/Time fields can be added to a constituent's profile and can be used as a trigger.
After the trigger has been select you will then find the following settings:
- Use This Year - For triggers that are a date field you can use this setting to tell the software if the year listed on the date should be part of the trigger. For example if you leave this setting set to NO then a notification would be sent out annually based on the month and day listed. Or if set to YES, a notification will only be sent once using the exact month, day and year listed.
- Make Active - Set to YES this will turn on the Automated Action so that it can be sent based on your settings.
- Send Notification to Constituent - Set to YES the notification will be sent to the Constituent who triggered it. Since Automated action can be used to just send internal notification this setting will allow you to include the triggering Constituent in receiving notification.
- Additional Internal Message - Customize the message that is sent internally to notify you of this triggered action
- Send Internal Notification- Identify who internally should receive this notification through email.
- Internal Recipients - Enter up to 5 email addresses with a semicolon between each address
- Send Internal Text Notification- Identify who internally should receive this notification through text message
- Internal Text Recipients - Enter up to 5 phone numbers with a semicolon between each phone number
- Create Follow Up Item- When set to YES you can create a Follow Up Interaction based on this triggered notification.
- Follow Up Description - Enter in the content for the Follow Up description
- Follow Up Type - Select which Follow Up Type values should be set on the Follow Up
- Follow Up Contact - Select which internal user should be set as the Contact for the Follow Up
- Add to a Category - When set to YES the constituent can be subscribe to a category based on this trigger
- Category Type - Select which Category value the constituent will be subscribed to
Once you have completed all the necessary settings make sure to click the green Save button to save them. If you have set your automated action Make Active setting to YES, notifications and messages will send when triggered on the following morning.